
Envizi API Access Tokens
Summary
You can use API Access Tokens as the authentication method to access Envizi API to view and extract Envizi API reports. Using API Access Tokens is a recommended approach to gain access to Envizi API, as opposed to the basic authentication method, which uses username and password in a traditional way.
What is an API Access Token?
An API access token is a JSON Web Token (JWT) that can be used to authorize a user when accessing remote application, like Envizi API, from a third-party application. API access token is typically being represented by a very long string (or text) with randomized alphumeric characters without any obvious patterns. It is not human readable, nearly impossible to be memorized, and is for computer applications to consume, communiate with each other and use for authentications.
Compared to the usual user names and passwords, an access token can be created and revoked independently of the password associated with the user account. Though API access token is associated with a single user account, multiple API access tokens can be created, and can be manipulated independently. Permissions or scopes for each access token can be individually adjusted upon the creation of the “token”, allowing or restricting access to certain resources of Envizi API. Similar to passwords, API access tokens must be protected and secured.
Advantages of using API Access Tokens
Improved security: API access tokens reduce risks in the event user credentials are compromised. You can reduce the scope of credential compromise by using an access token for automated tasks. In this case, using an application-specific token doesn't expose the broader system in the event that automation or script files are compromised. If a token gets compromised or is used in automation that is failing or posing a risk, you can simply revoke the token. You do not need to rotate or revoke the user's credential.
Audit and track: Similar to when user logs in to the web application, the system tracks when an access token is used, what sessions are created from that token, and the actions that are performed in those sessions.
Manage automation: A token can be created for each script or task that runs API reports. This allows you to silo and review automation tasks across your organization. Additionally, by using tokens, password reset or metadata changes (username, email, etc.) on user’s account will not disrupt automation, in comparison to the traditional approach when user credentials are hard-coded in automation scripts.
Who can generate and use API Access Tokens
Any non Single Sign-on user who has access to the Envizi platform (except view only users), is able to create personal API access tokens if the permission has been granted to the user login. However it is generally recommended that as a best practice, API access tokens shall be generated against a generic login to be used for API connection only, as opposed to an individual user login.
If you are a partner level user and have access to multiple Envizi production servers with the same user name, you would need to create a separate login with a different user name to generate the tokens from.
Feature Enablement
Your login will need to have an ‘API Token Personal Role’ in order to generate and use API tokens.
Step 1: From Manage → Contacts & Logins → find your contact → right click ->Logins → right click → Add Personal Role for API Tokens
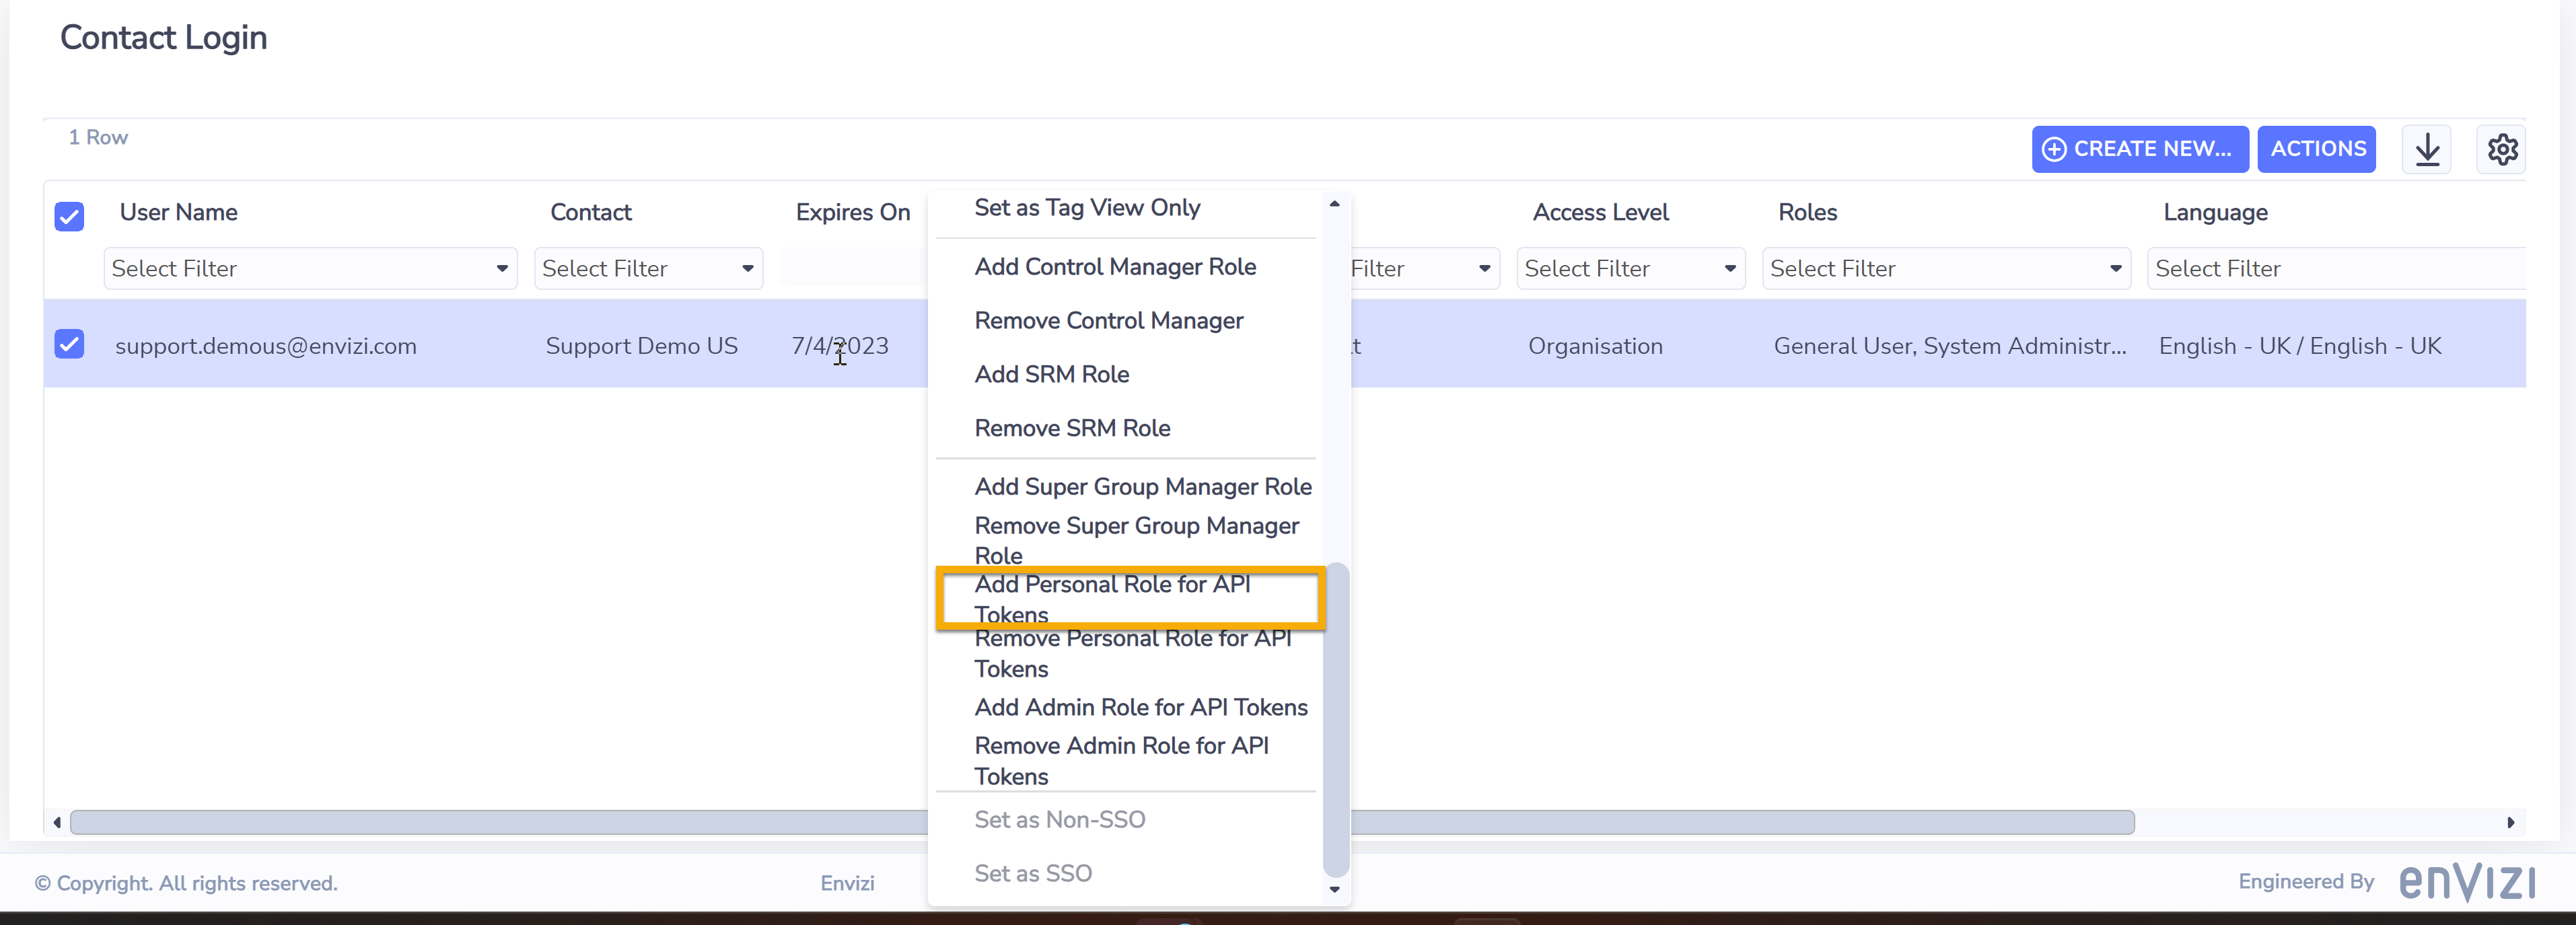
Step 2: Log out and log back in to the system again. It is recommended to wait for approximately 2 to 3 minutes in between to allow the system to refresh your access right.
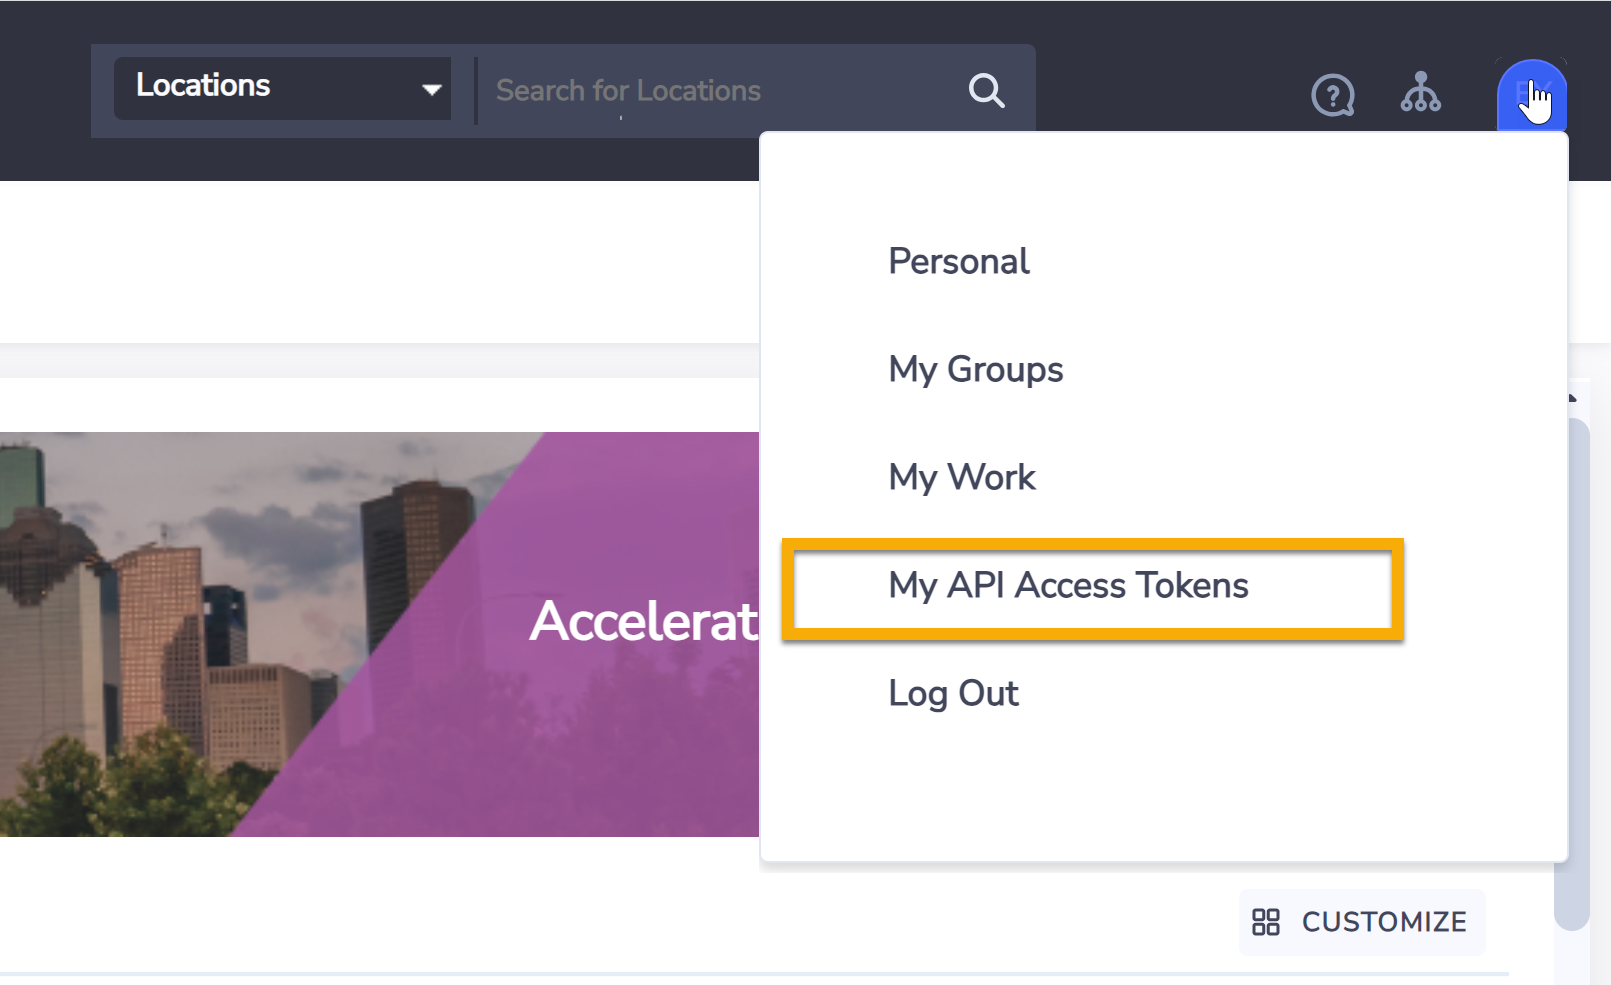
Step 3: You should be able to see the ‘My API Access Tokens’ menu under the Personal Menu from the top right.
System Admin Users Only
Adding or removing API Access Token roles can only be done by a system administrator user of the Envizi platform. If you do not see these buttons, please approach your organization’s Envizi system admin users to grant the role for you.
How to generate a new API access token?
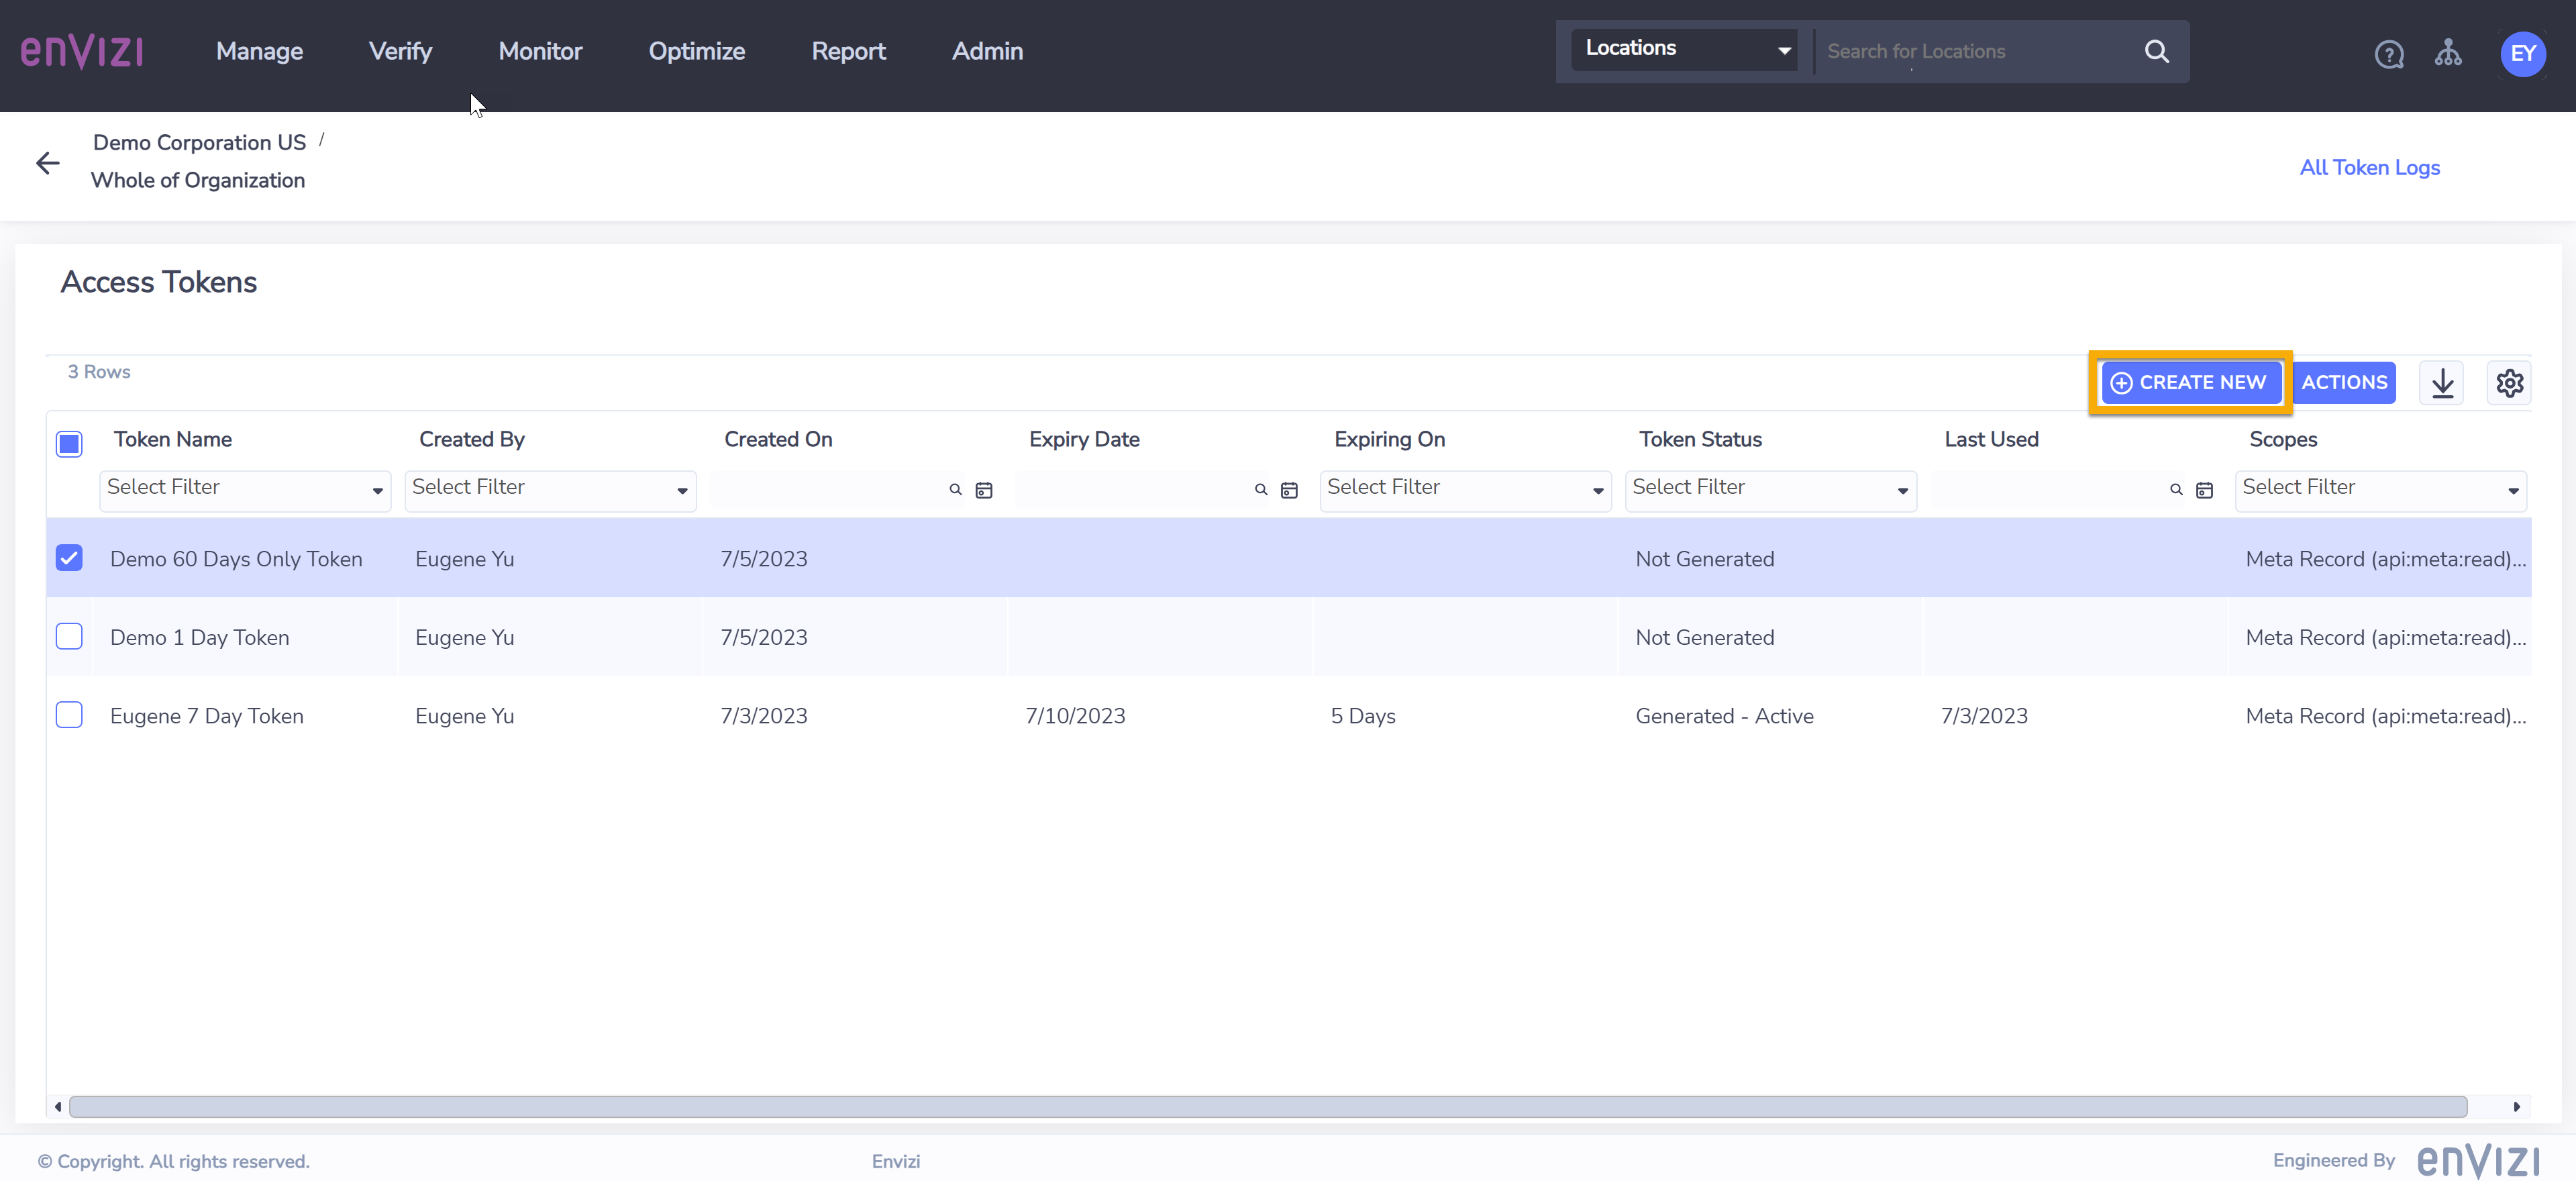
Once you have the API Token Personal Role assigned to your login, click My API Access Tokens from the Personal menu, select Create New button found on upper-right corner of the grid. The Create New pop-up screen will appear.
Fill in the details of the new access token:
Token Name - enter the purpose or name of the token. Please make sure the token name is unique among all other token names otherwise an error will be reported when SAVE.
Expires On - select the number of day(s) the JWT (token) will be valid after it was generated. Choose from:
1 day
7 days
30 days
60 days
90 days
1 Year
Never
Scopes - select the scopes of Envizi API resources that JWT (token) will be authorised. At least one of them needs to be selected but it is recommended to select both:
Meta Record - only includes meta calls to retrieve accessible API report names and parameters
Report Record - only includes api data calls to retrieve api report data
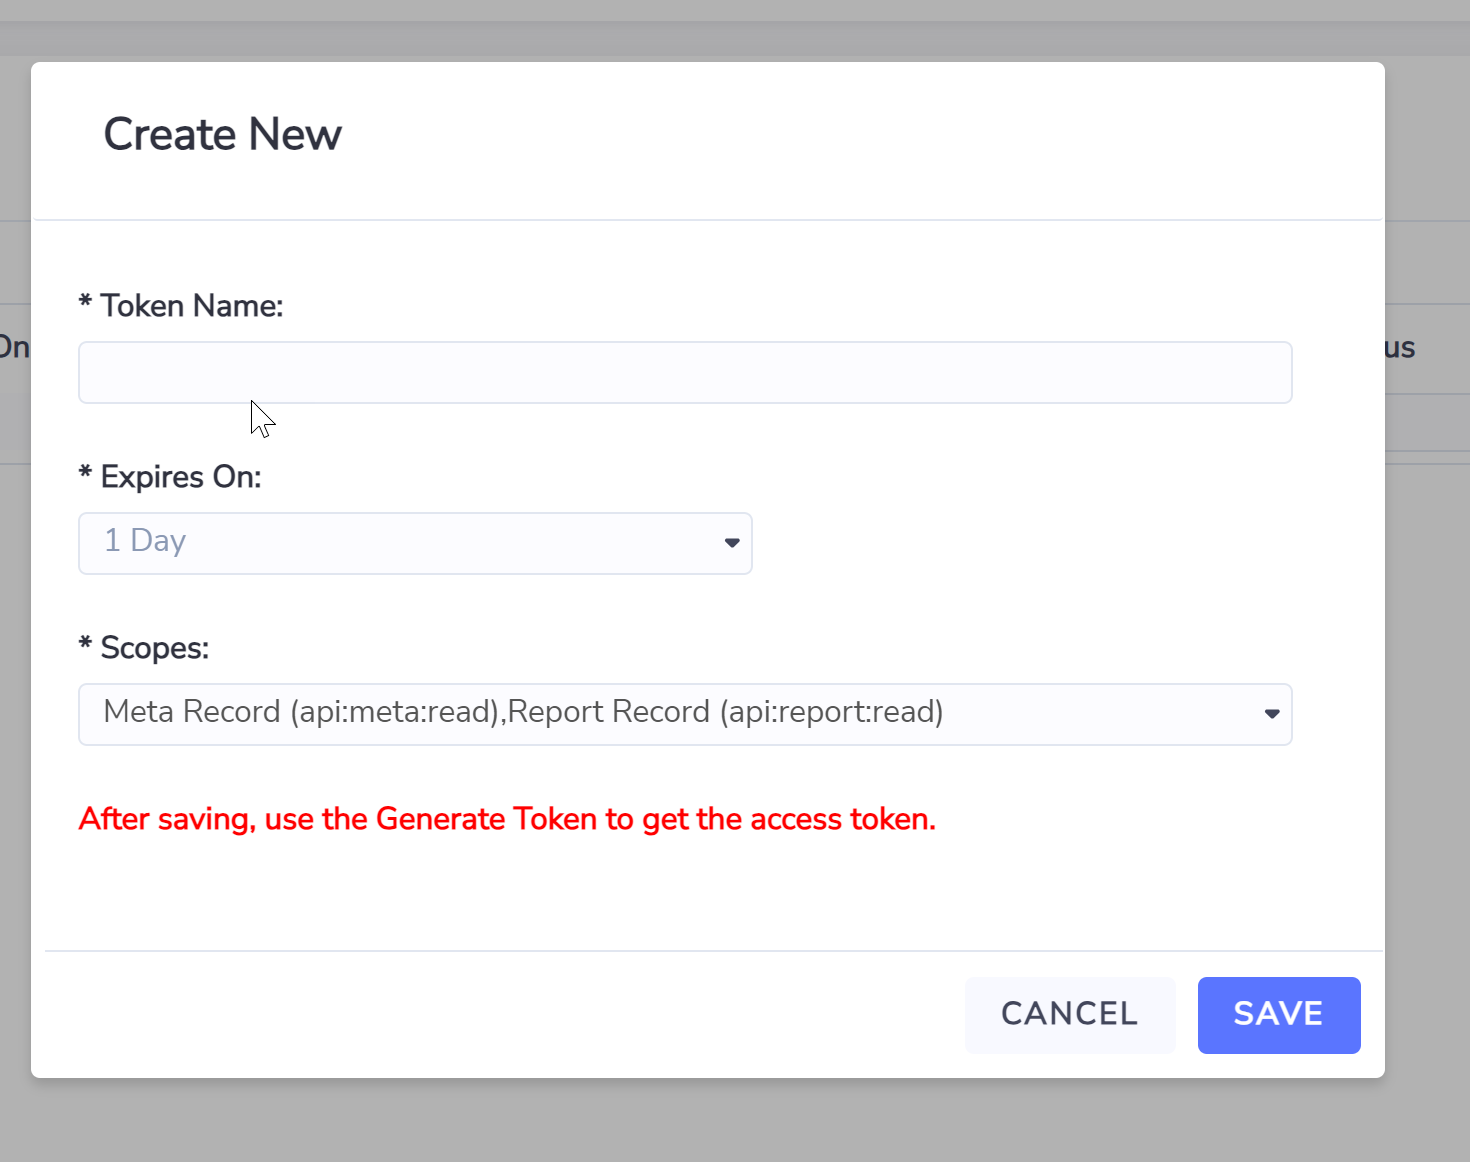
Select Save button to save the details of the access token.
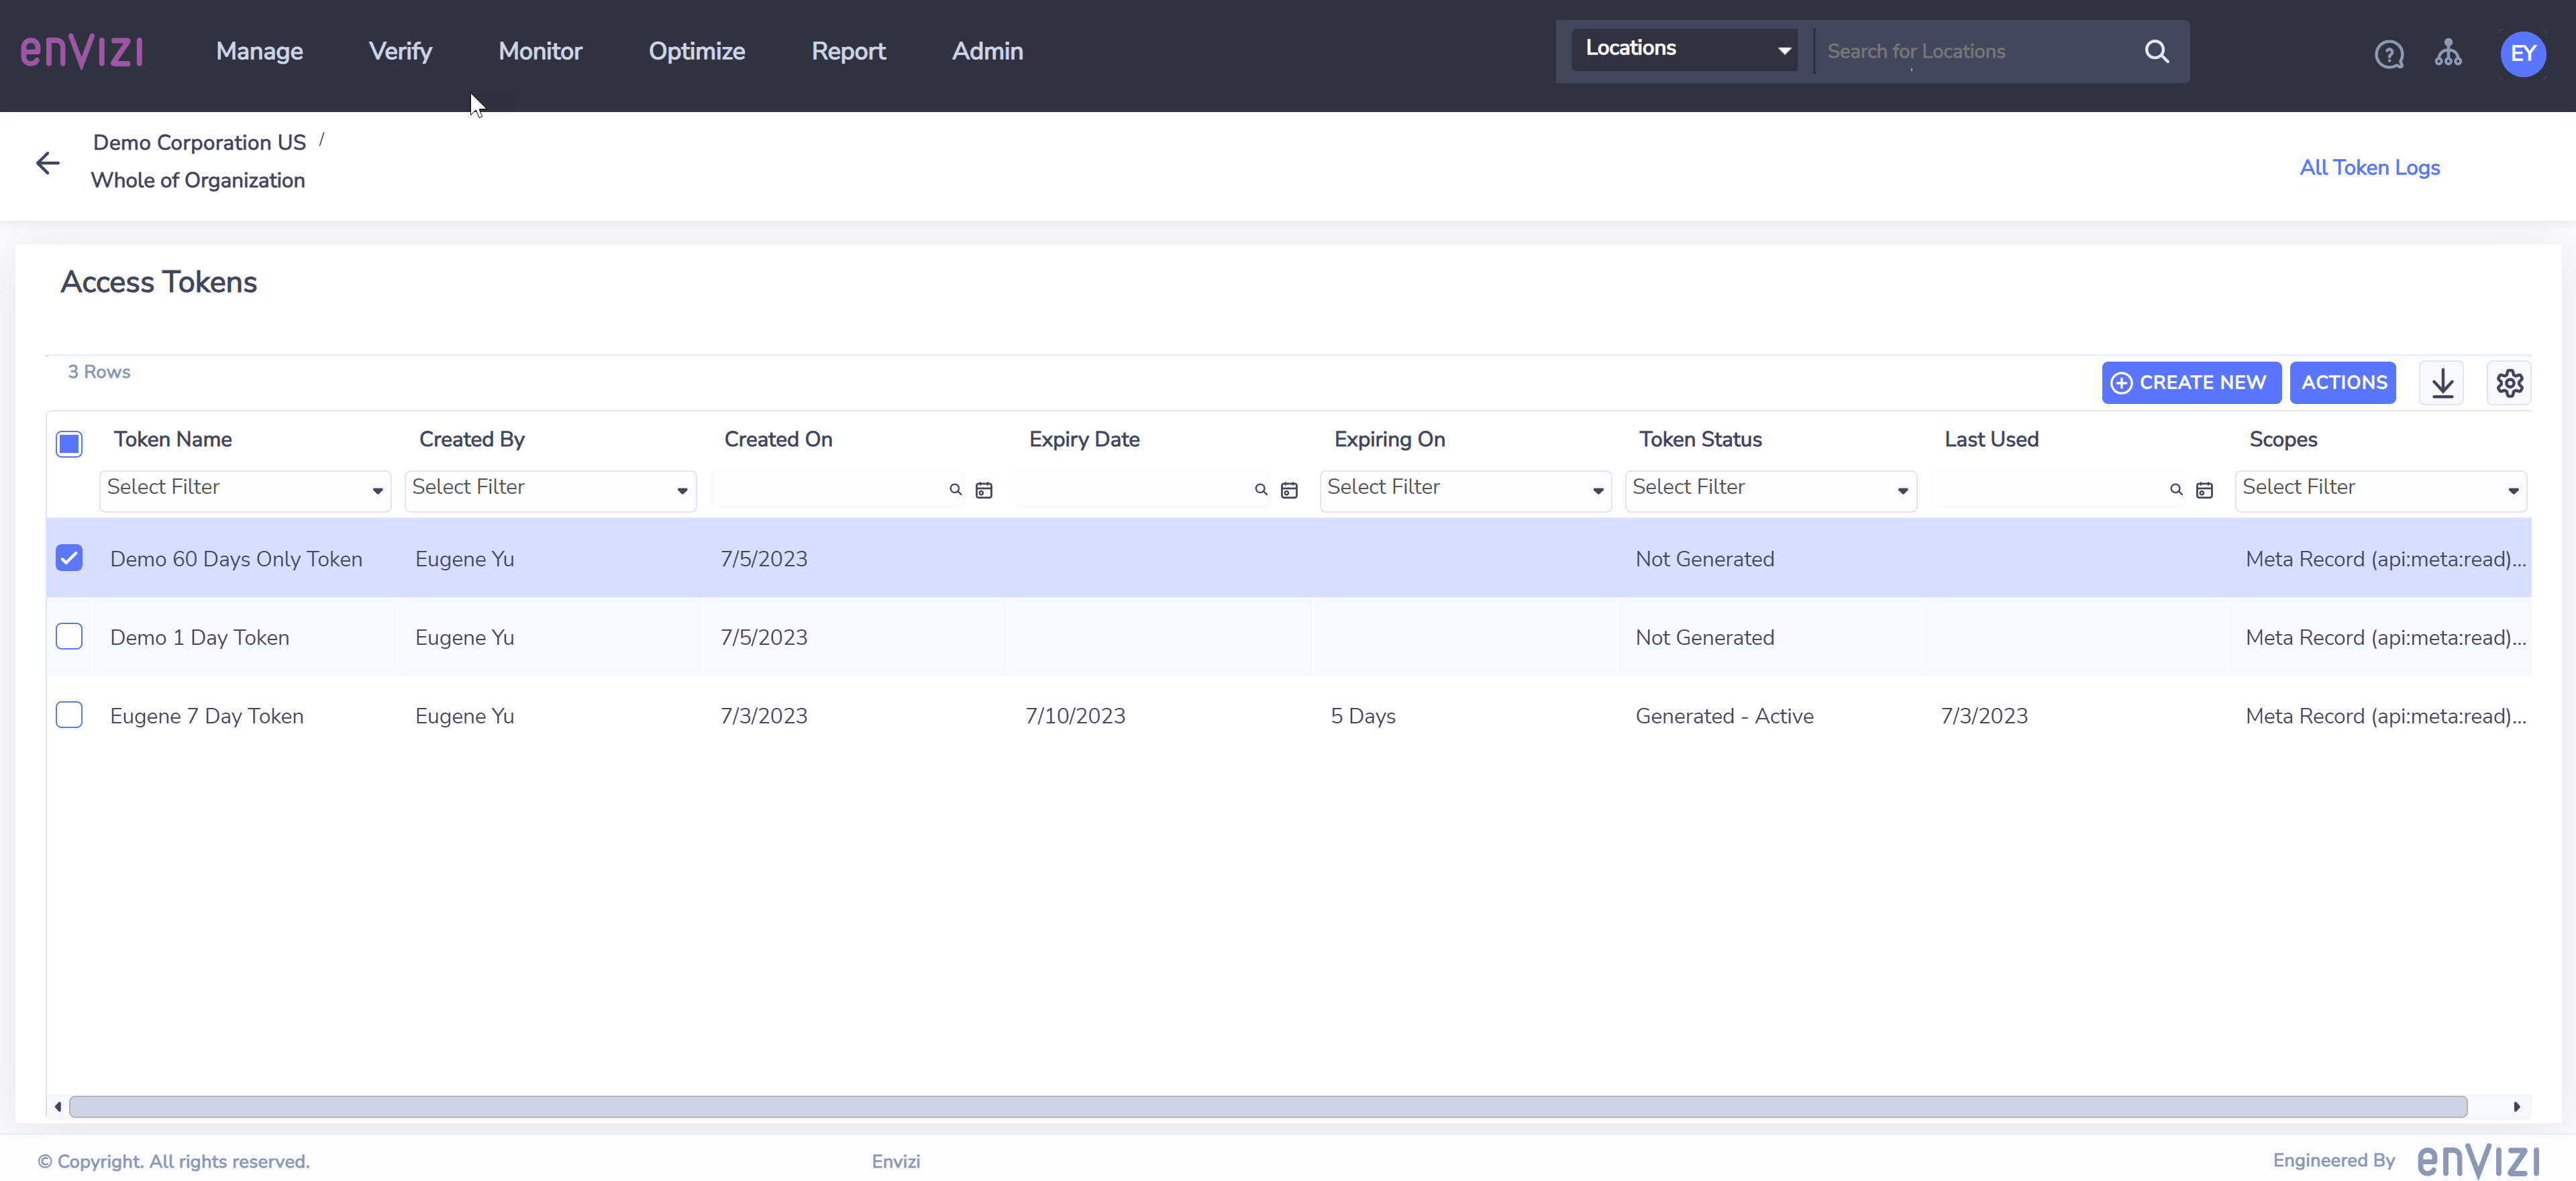
The new access token will appear on Access Tokens page with Token Status of Not Generated.
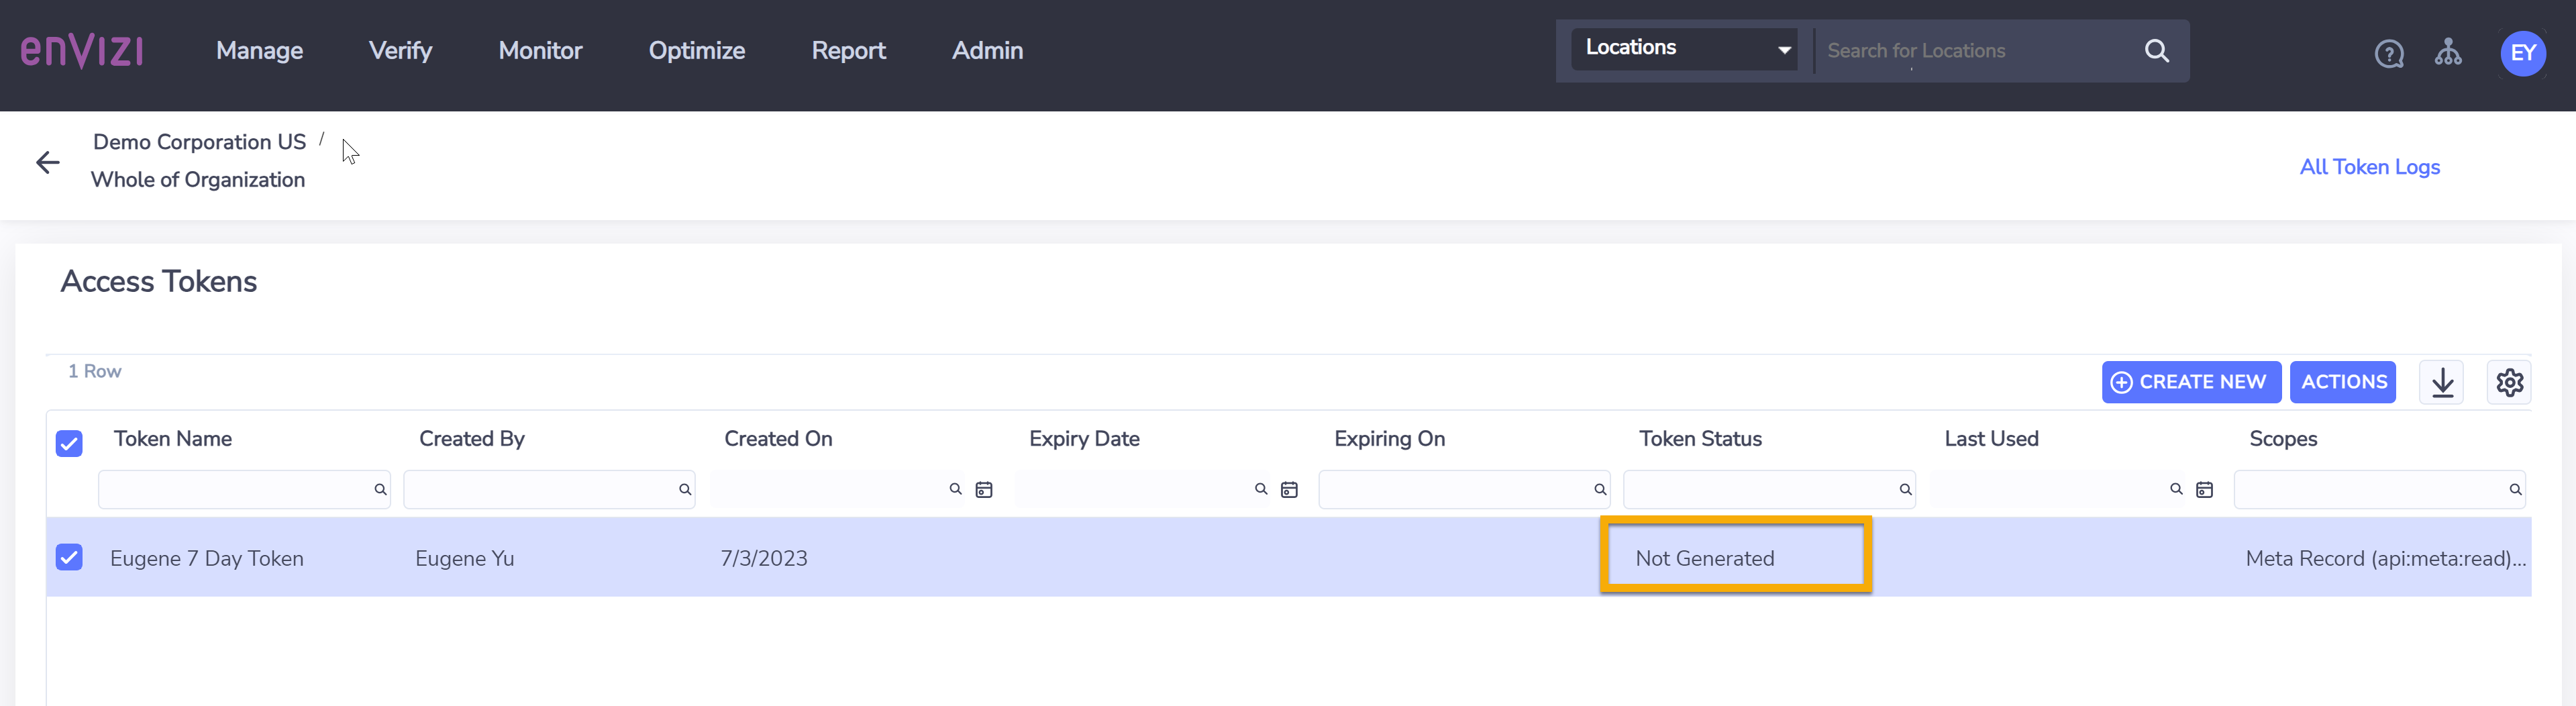
Right-click on the new access token to open the actions menu.
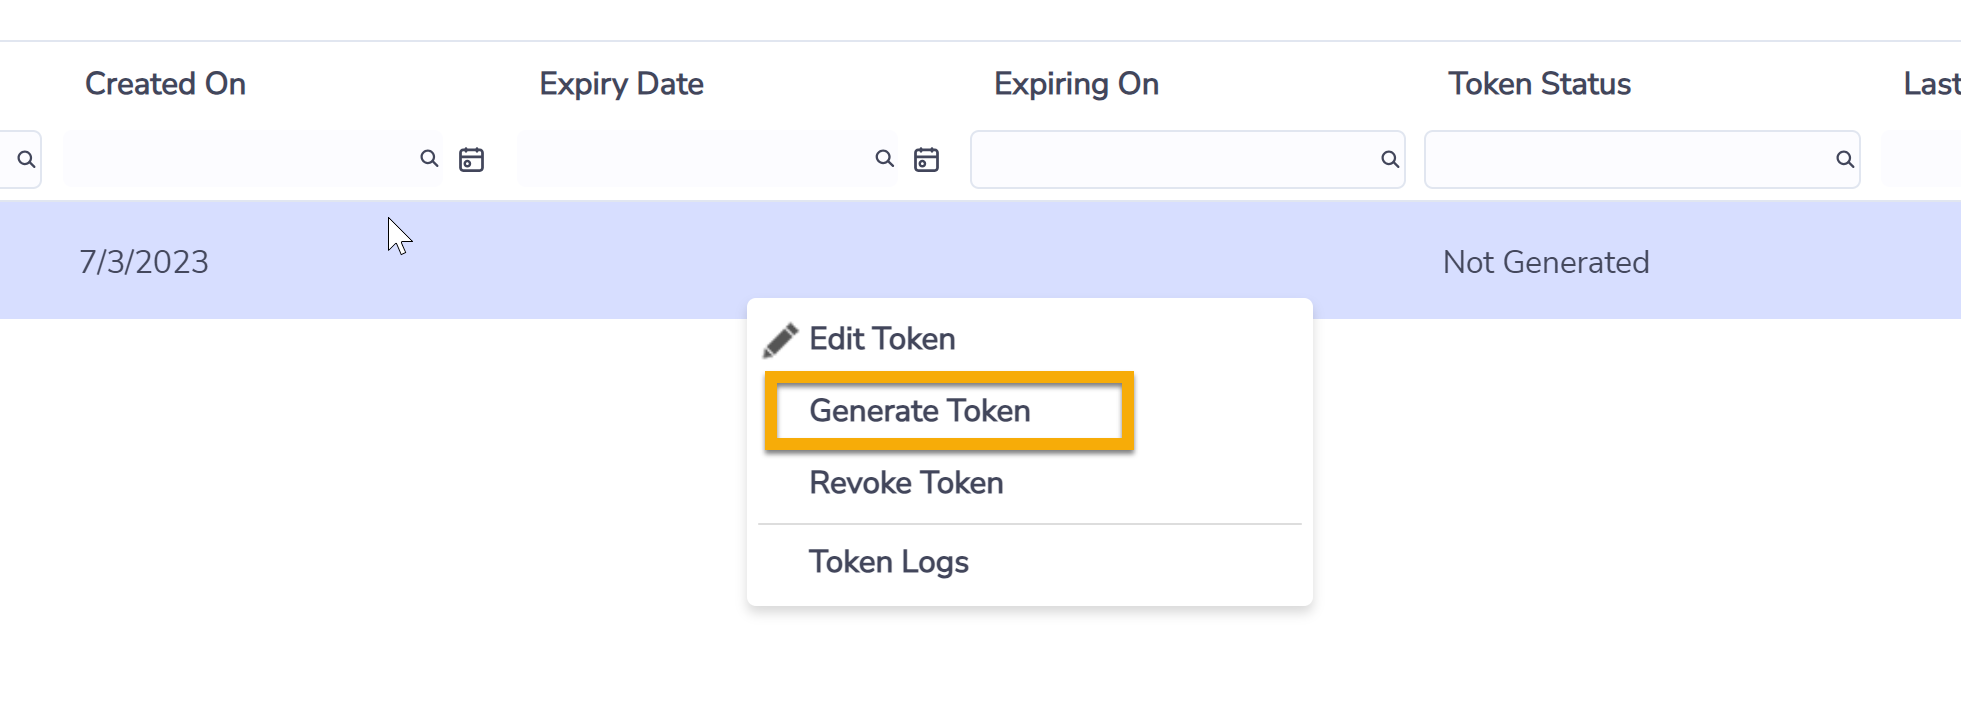
Select Generate Token from the actions menu. The Generate Token pop-up screen will appear.
On Generate Token pop-up screen, note the calculated expiry date for the JWT (token).
Copy the full content of JWT (token). It is very important that you completely copy and securely store the JWT (token) somewhere else since for security reasons, it will no longer be visible on screen once the token is saved.
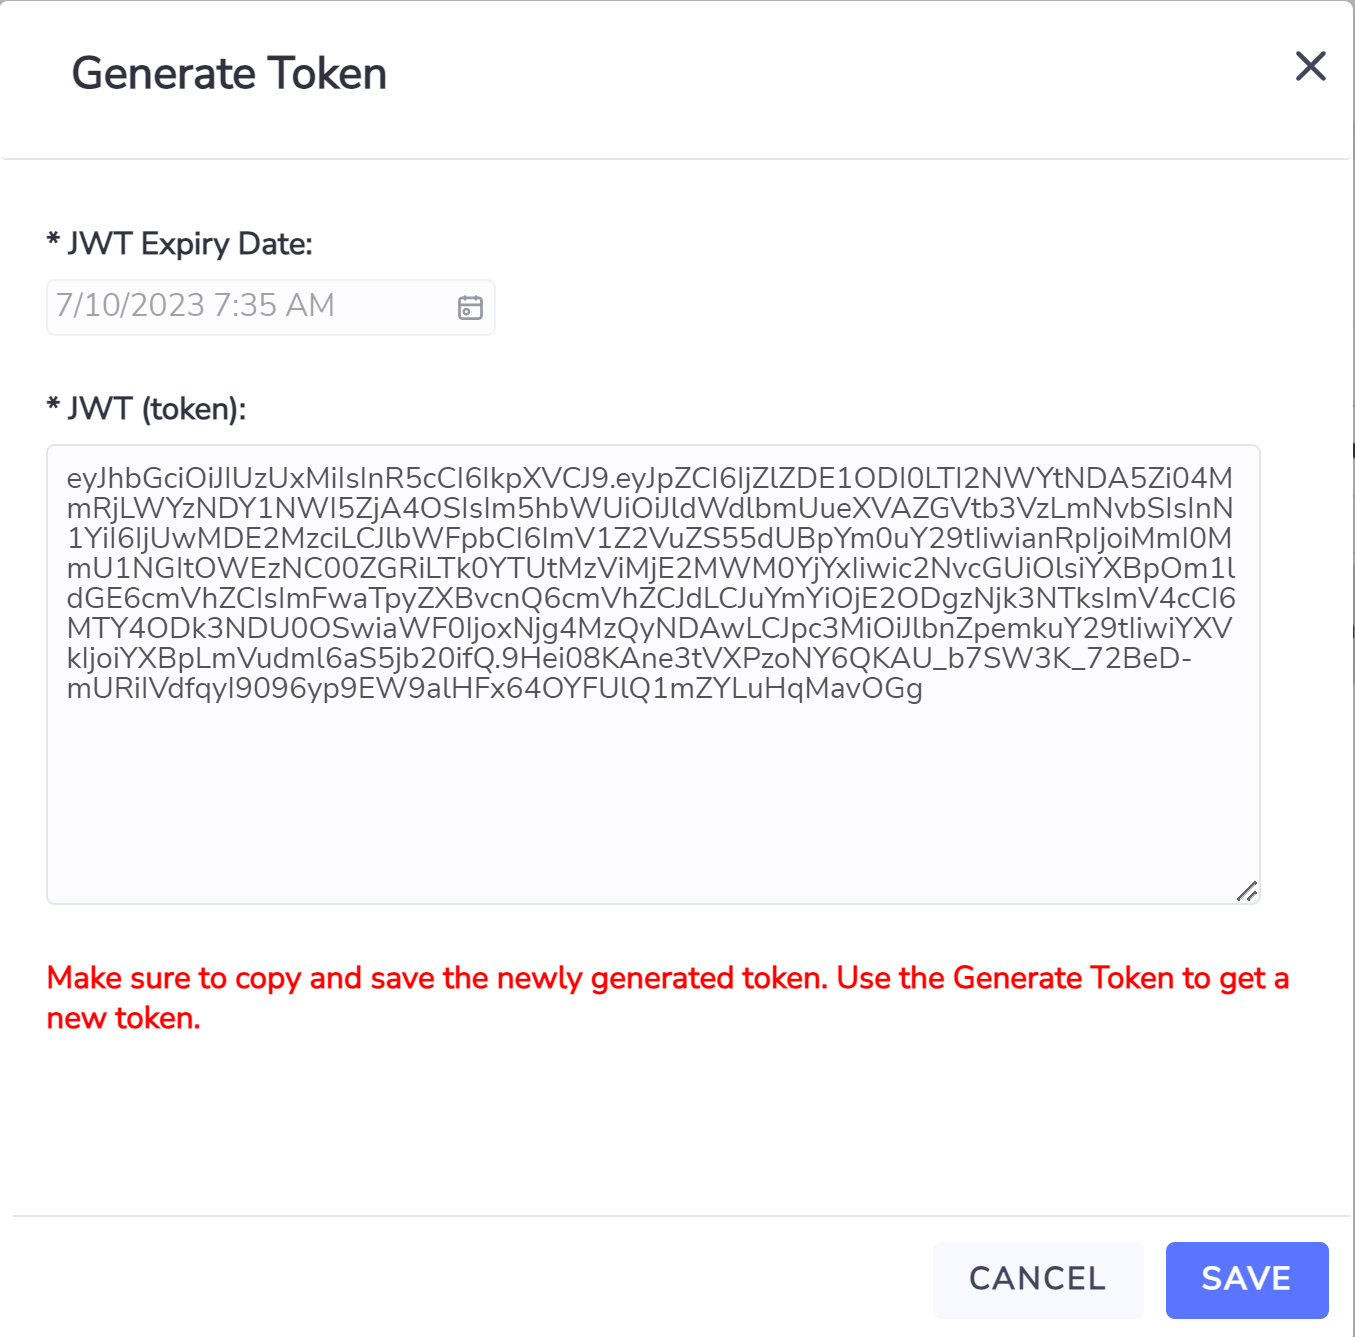
Select Save button to save the JWT expiry date and JWT (token). You will also receive an auto generated email about the newly generated token, including its expiry date and data scopes.
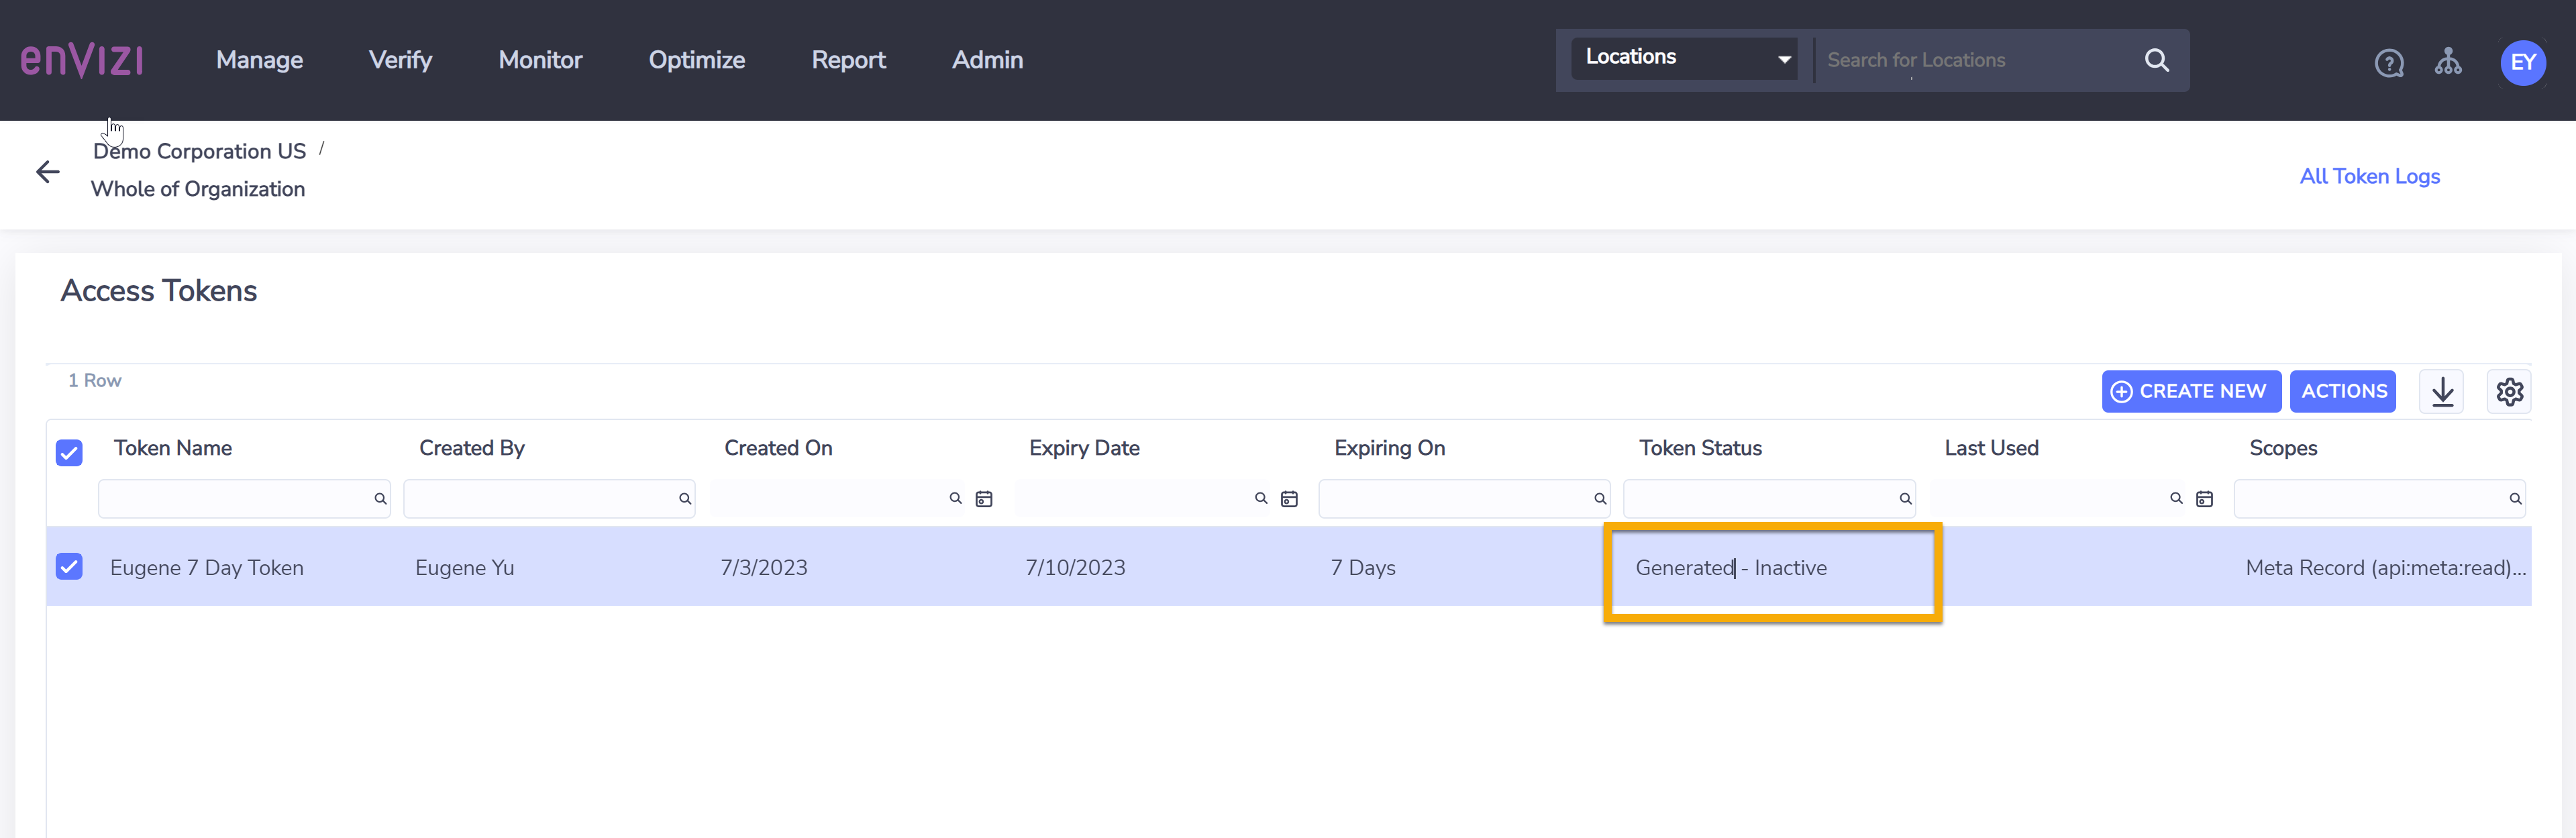
The new access token will appear on Access Tokens page with Token Status of Generated - Inactive. When the token is later being used successfully for the first time, the status will change to ‘Generated - Active’.
New API access token can be re-generated in case the original token text is missing after saving. However saving a newly generated API access token will automatically invalidate the previous token.
How to use an API access token?
In general an API access token needs to be supplied as part of the API authentication process as a “bearer” token when connecting to Envizi API server. Various API client tools have different ways of configuring the API access token for authentication purposes. Below are simple examples of some of the commonly used tools. For advanced API authorization set up please refer to individual tool’s own manual or documentation.
Example 1 - using text based API Client
Add Authorization on HTTP request header with the value of Bearer followed by the JWT (token).
Authorization: Bearer eyJhbGciOiJIUzUxMiIsInR5cCI6IkpXVCJ9.eyJJZCI6ImQ5MjhhM2E4LWYyMDk.....
Example 2 - using Excel Power Query
Below steps screenshots are taken from Excel Office 365 desktop version.
| 1 | Go to Data > From Web Open the Excel application, go to the menu then choose Data > From Web , then choose Advanced. | 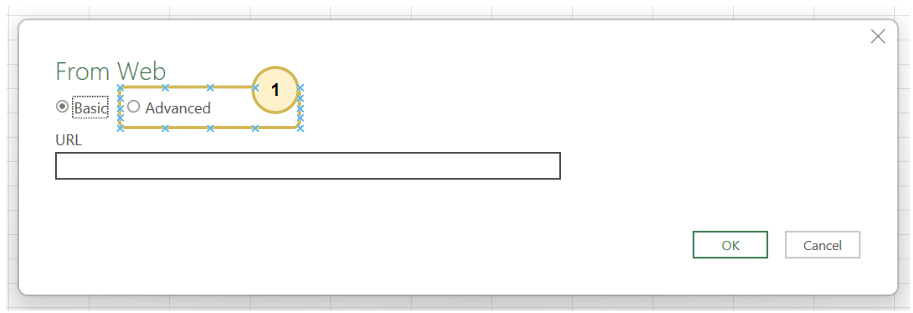 |
| 2 | Use the access token
| 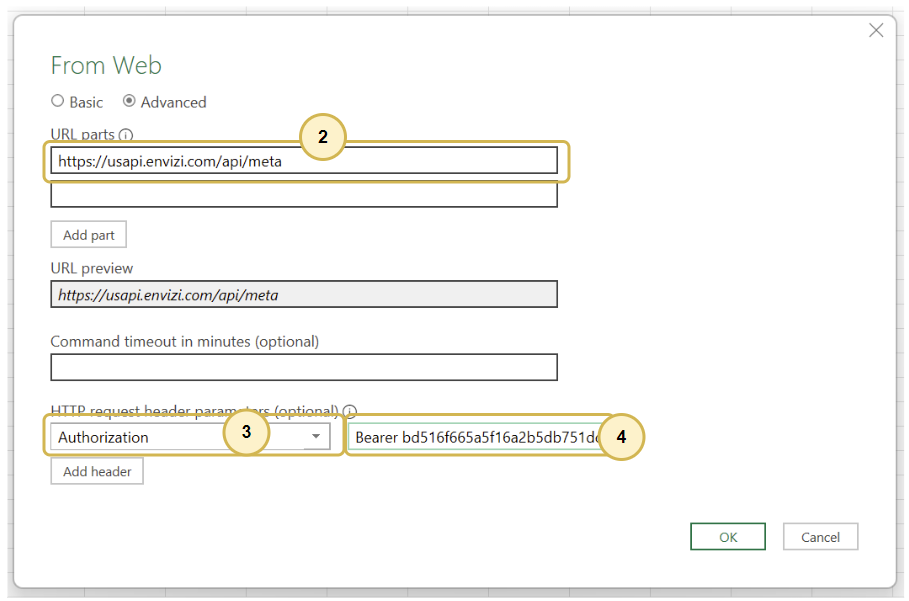
|
| 3 | Access web content anonymously Choose Anonymous from the left option and select Connect button to continue (if you do not see this screen after clicking ‘OK’ in step 2, please refer to the note* below) | 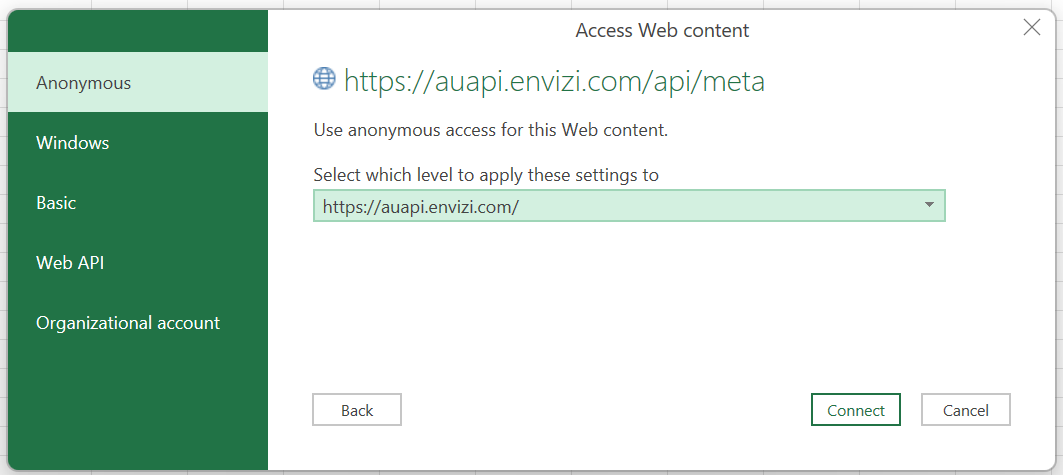
|
Example 3 - using Power BI Desktop
| 1 | Go to Data > From Web Open the Power BI Desktop application, go to the menu then choose Data > From Web , then choose Advanced. | |
| 2 | Use the access token
|
|
| 3 | Access web content anonymously Choose Anonymous from the left option and select Connect button to continue (if you do not see this screen after clicking ‘OK’ in step 2, please refer to the note* below) | 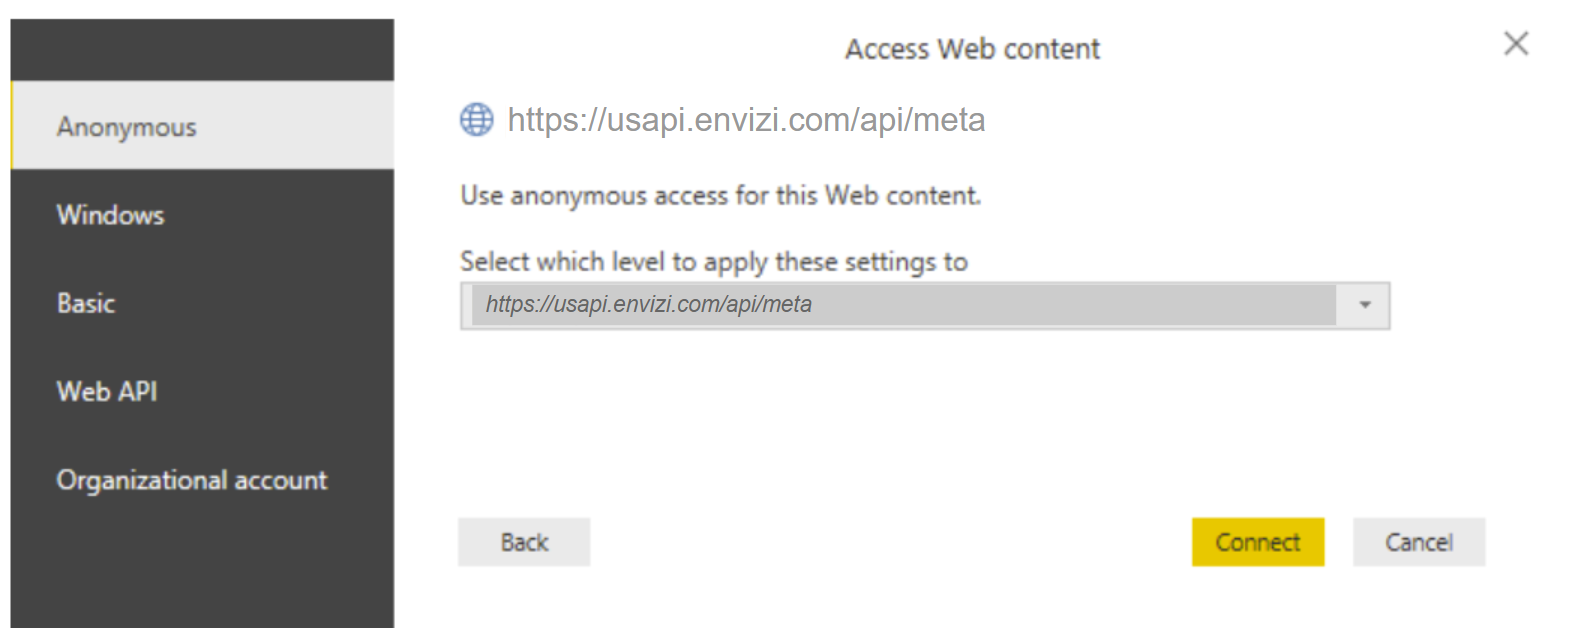
|
*Note:
If you do not see the ‘Access Web content’ screen in step 3, it is most likely that you may have accessed the Envizi API URl using a basic authentication method before (user name + password). You would need to remove the credential that had been saved previously in your Excel or Power BI Desktop environment, before you can switch to use API tokens for authentication.
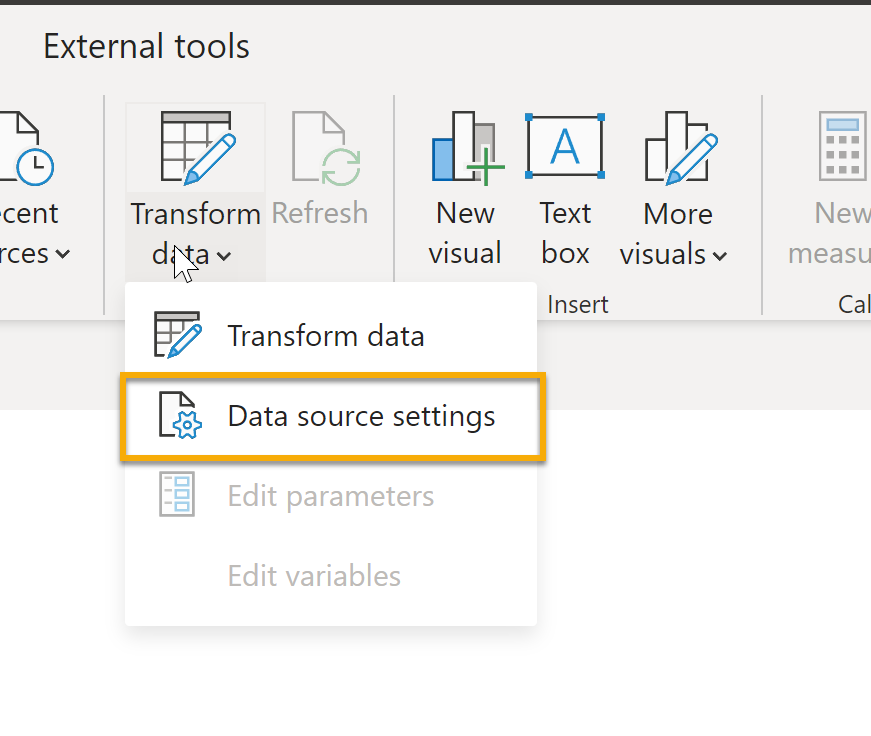
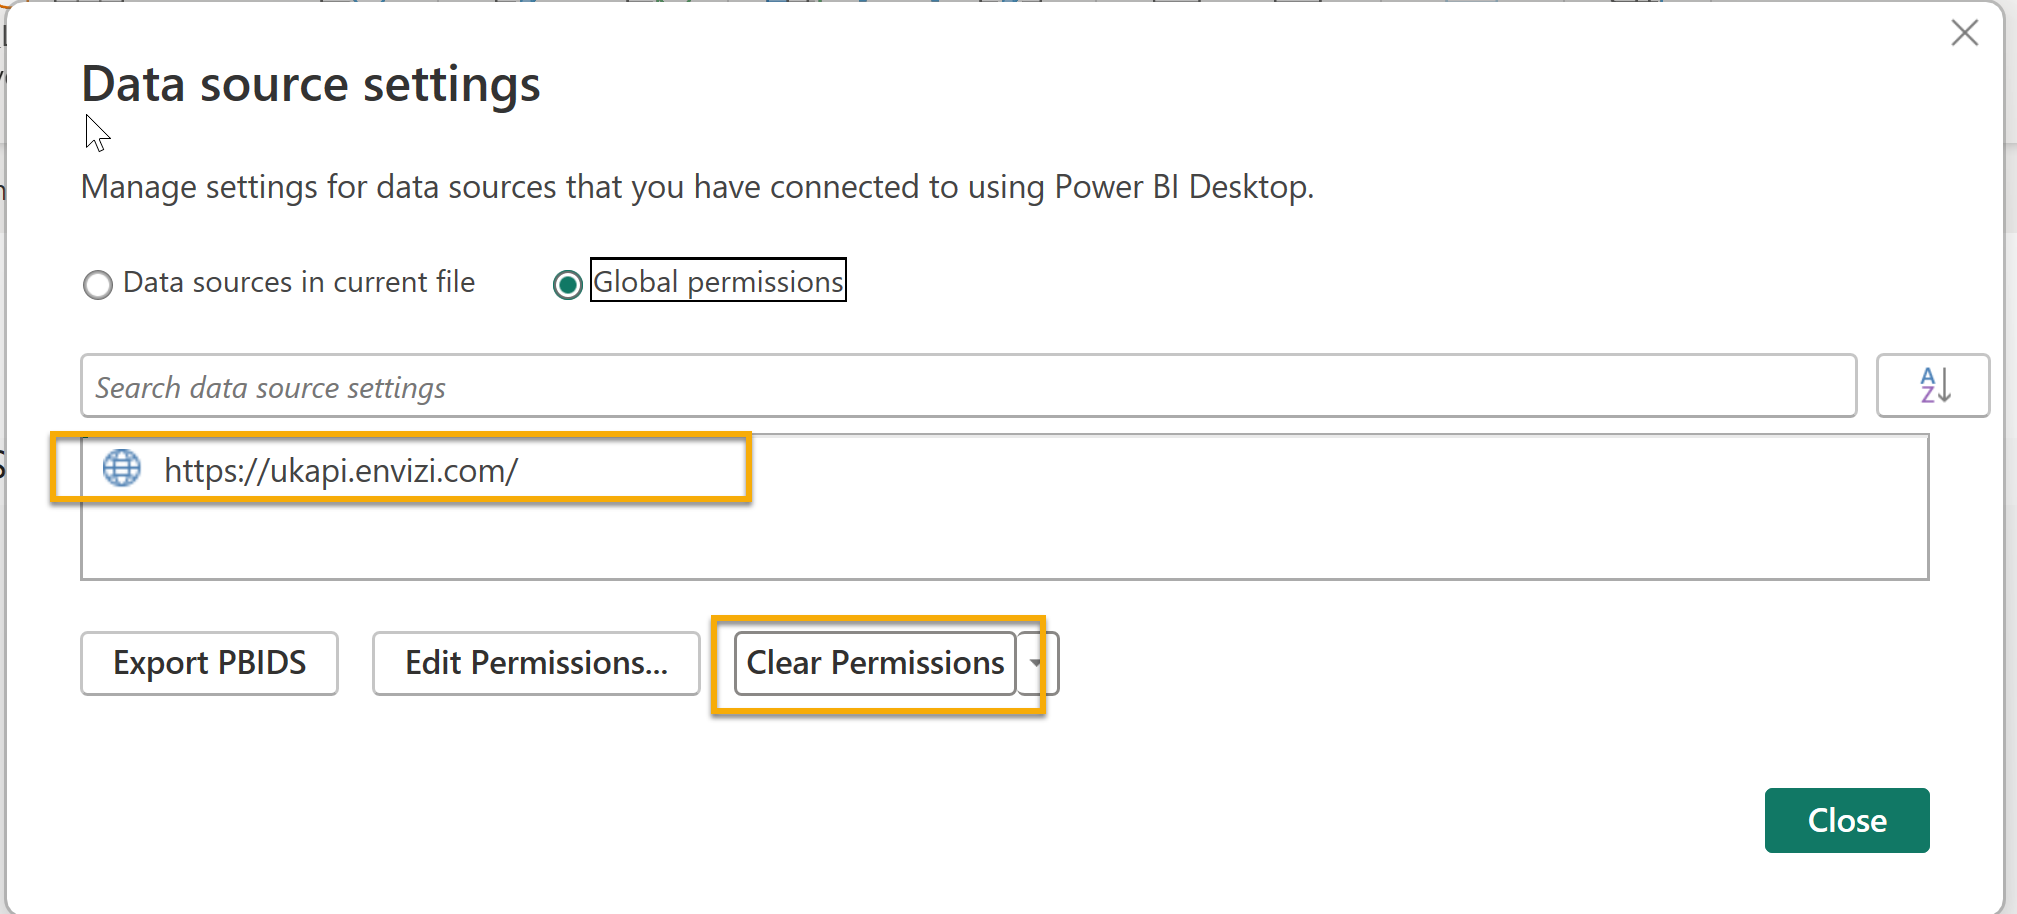
To do this, go to Transform Data → Data Source settings → Global permissions, choose the Envizi API url you would like to use tokens to access, and then 'Clear Permissions'.
Once this is done, repeat the the above mentioned steps to connect using an API token.
Example 4 - Using Postman
| 1 | Choose ‘GET’ as the API method and enter the required API report URL |  |
| 2 | Click ‘Authorization’ tab, and choose ‘Bearer Token’ from the ‘Type’ drop down list. |
 |
| 3 | Enter the saved token text into the ‘Token’ text field. | 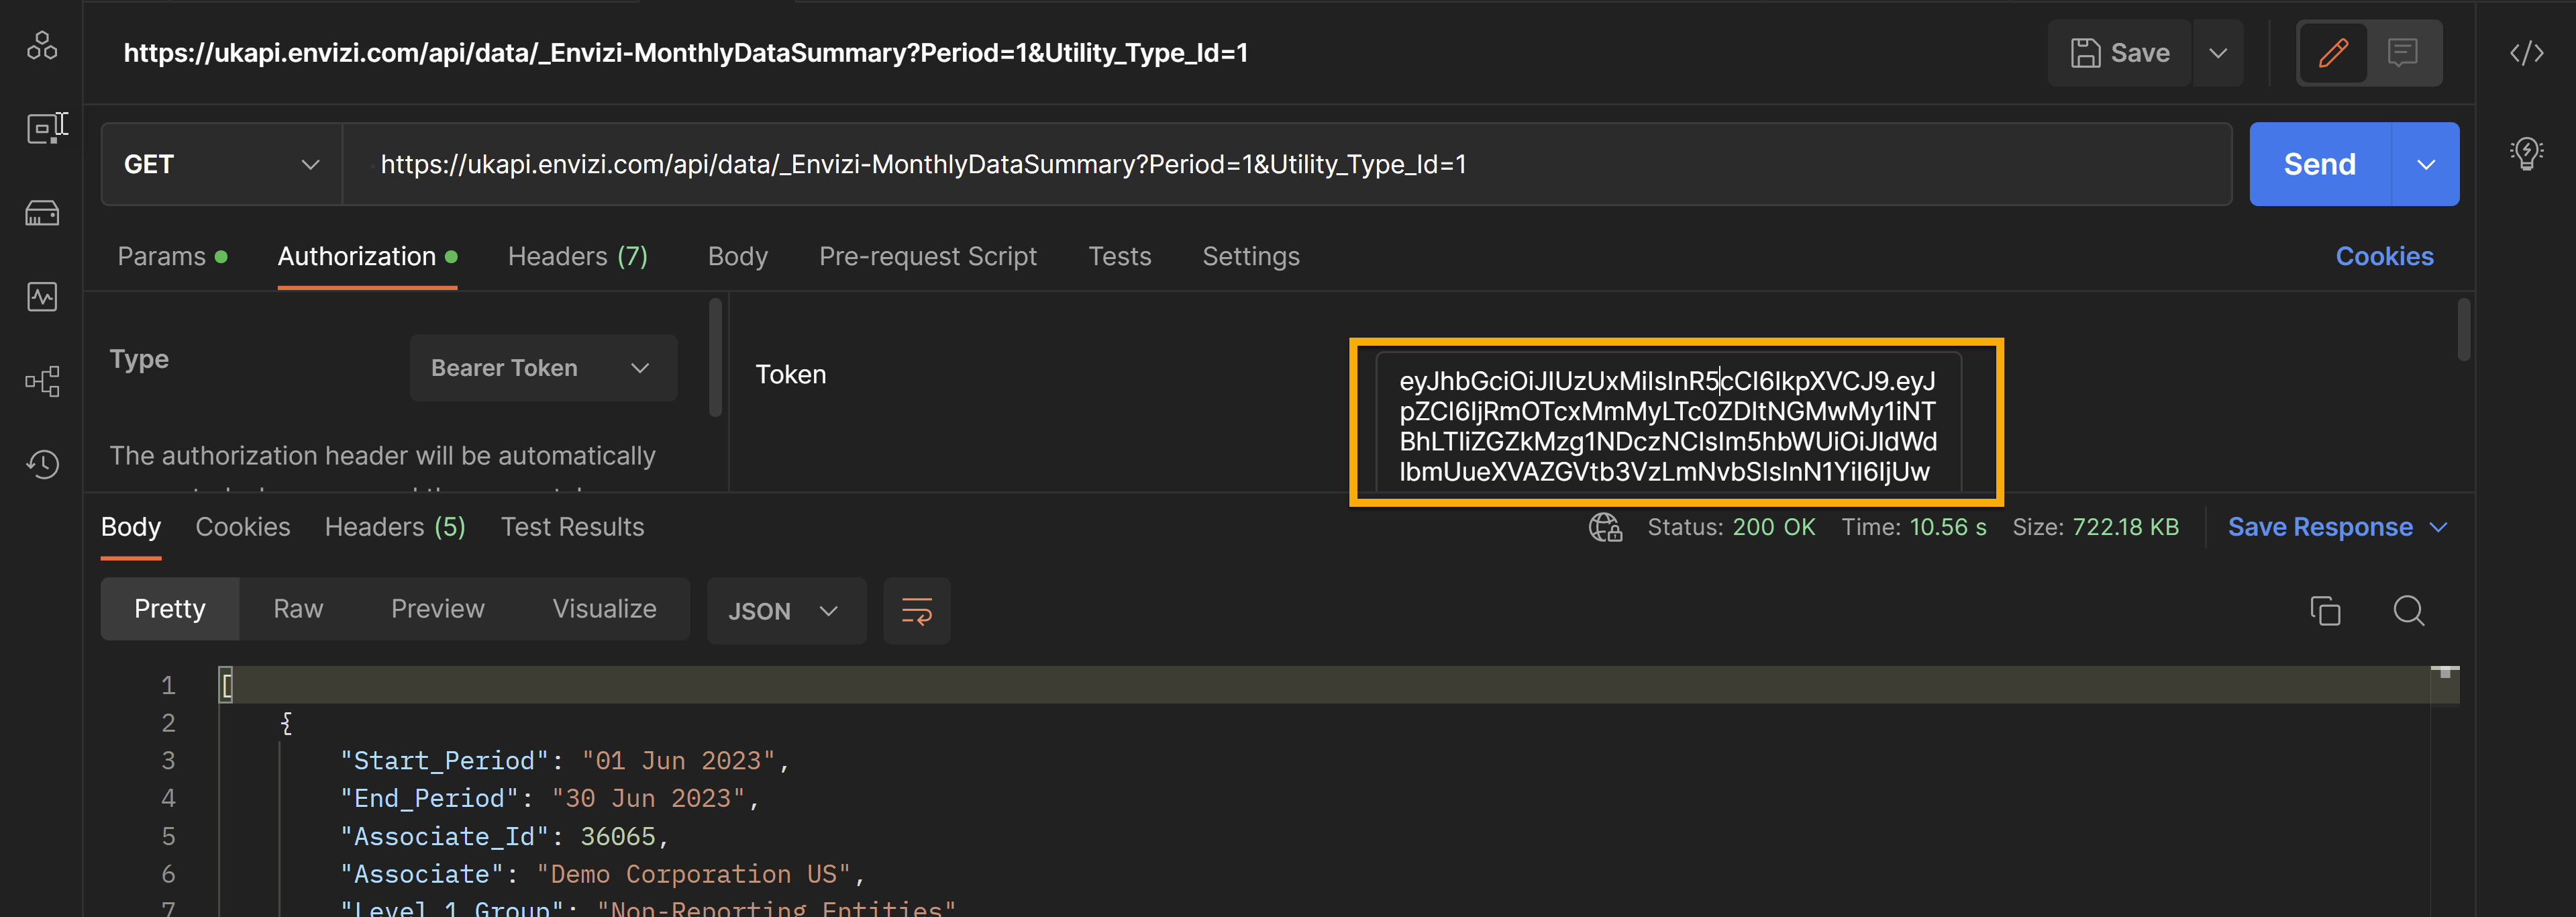
|
| 4 | Click ‘Send’ to request API report data | 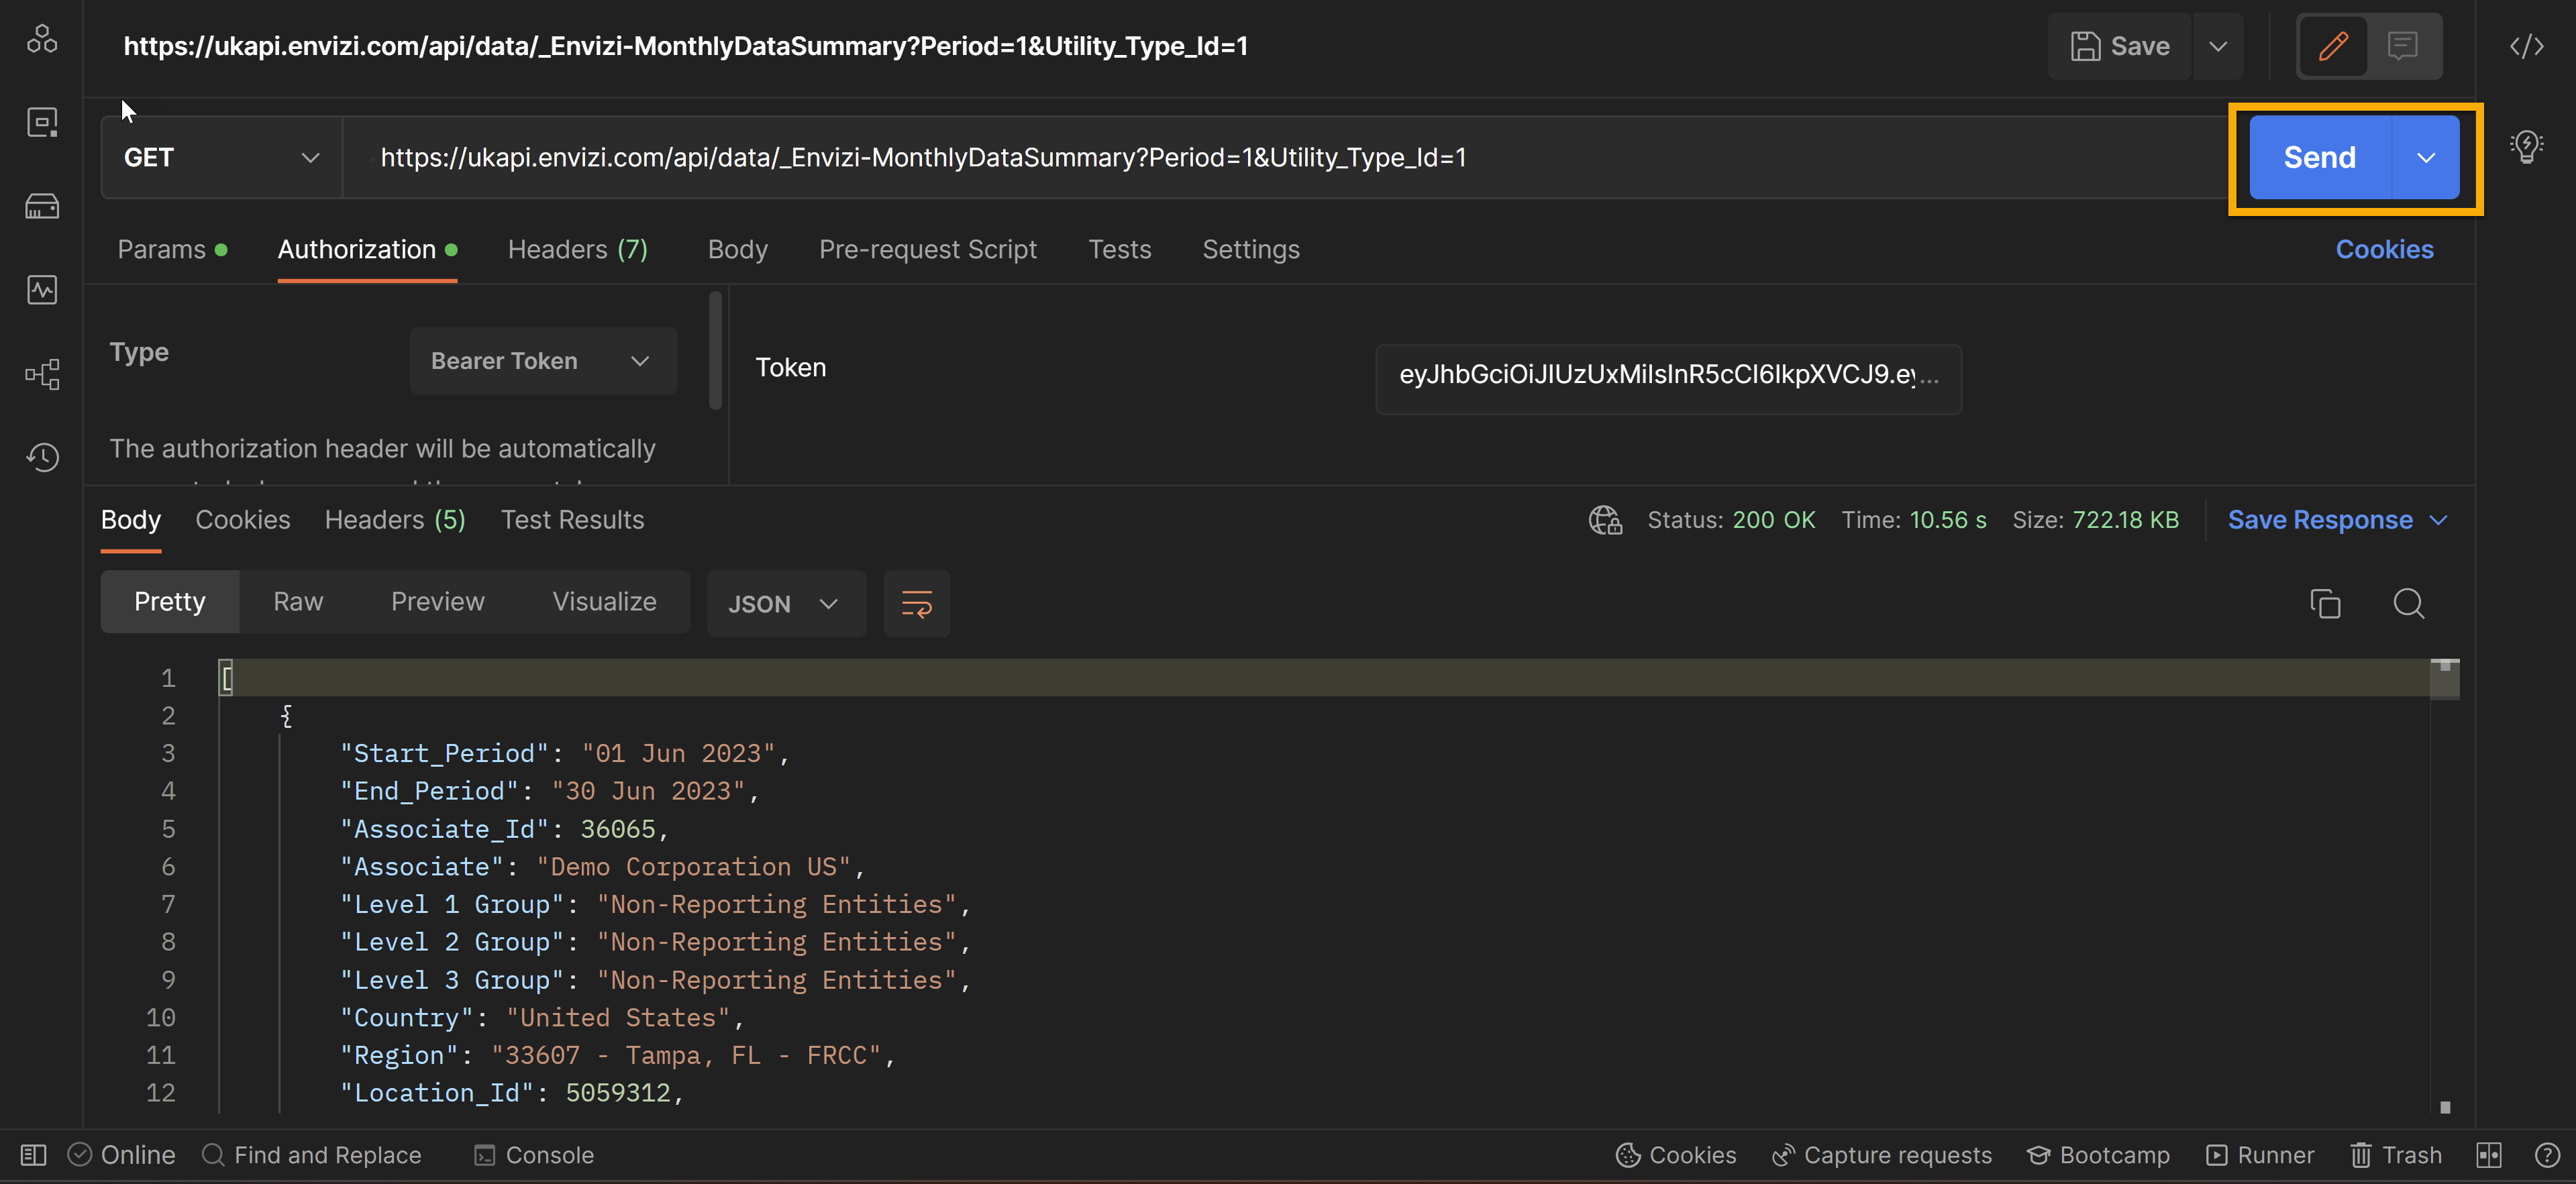 |
If you have a same login user name on multiple Envizi production servers, you will likely encounter a 401 Unauthorized error when using API tokens to connect. This is a security feature and you would need a separate login with a unique user name to generate API tokens.
How to review existing tokens and audit their usage?
From Personal menu → My API Access Tokens, you will be able to find a list of existing tokens associated with your login. The list includes information such as when tokens expire, whether they have been generated, and their data access scopes.
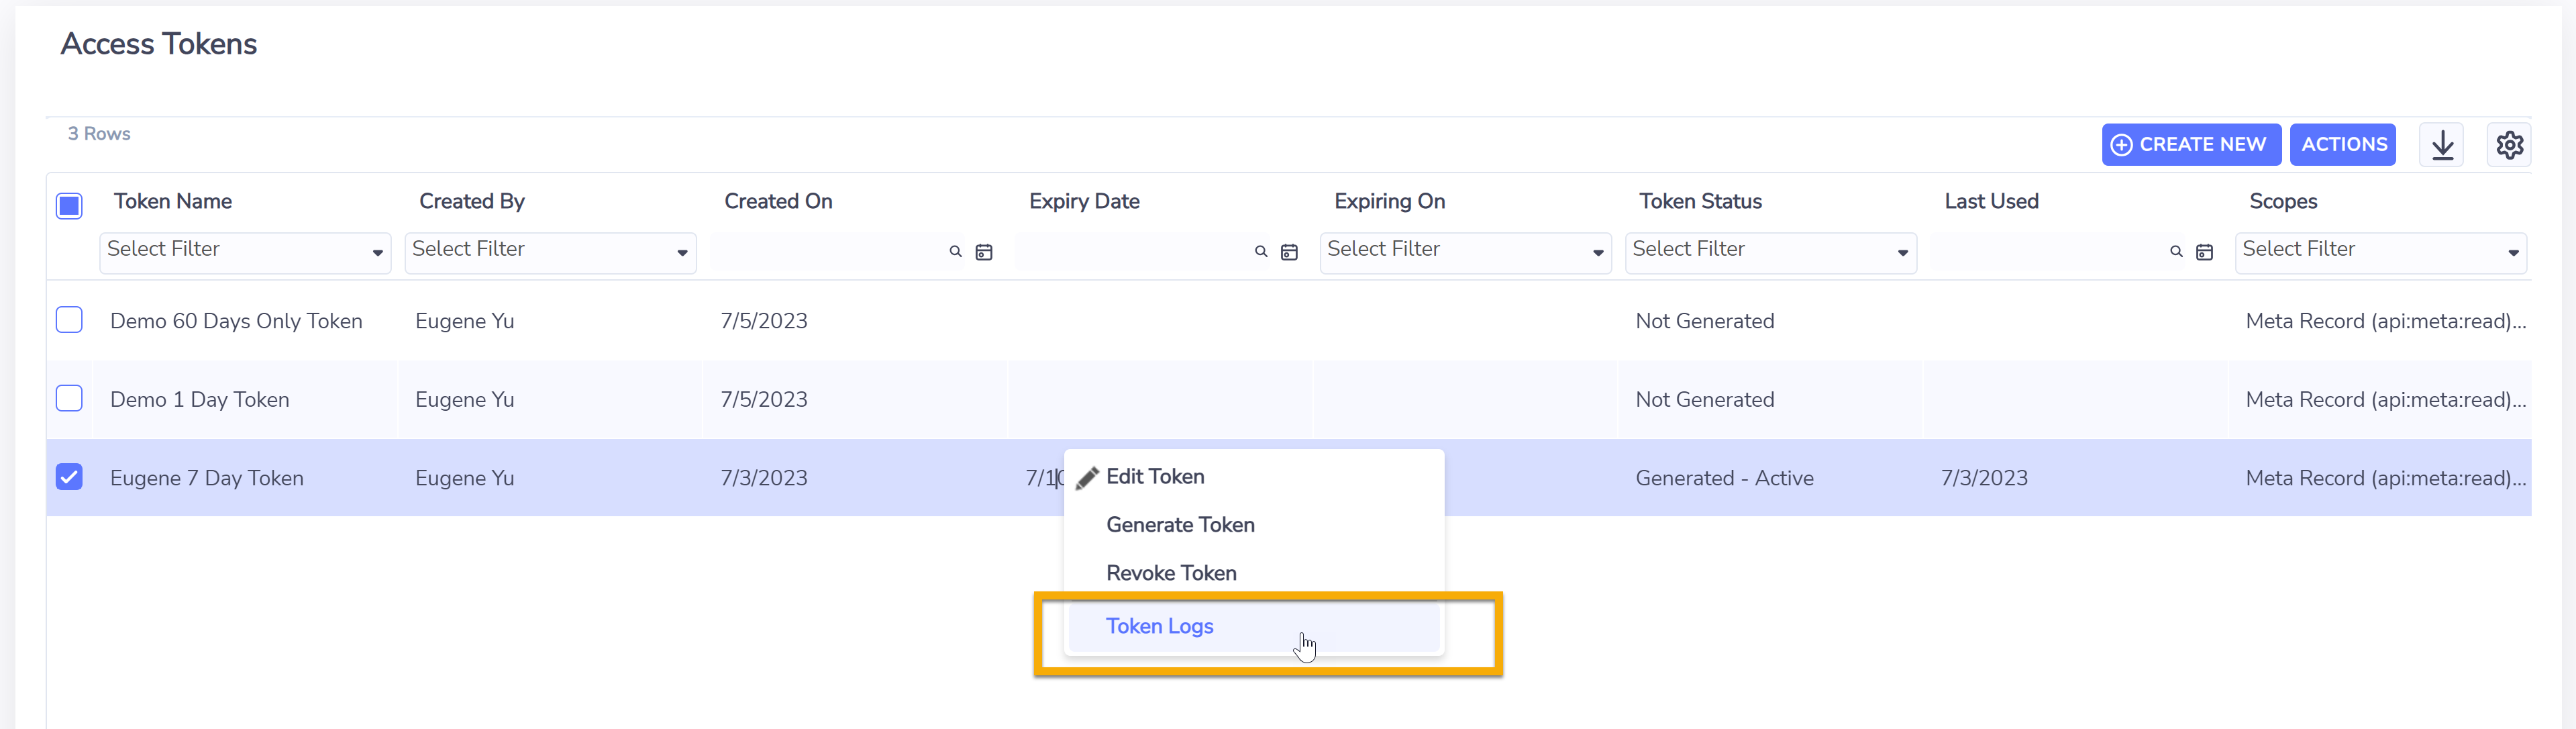
Right click an token and choose ‘Token Logs' to see its usage and activities. Here you will be able to find all logged activities associated with the token, such as when the token was created, when the token was last generated and when someone or tool used the token to access Envizi API.
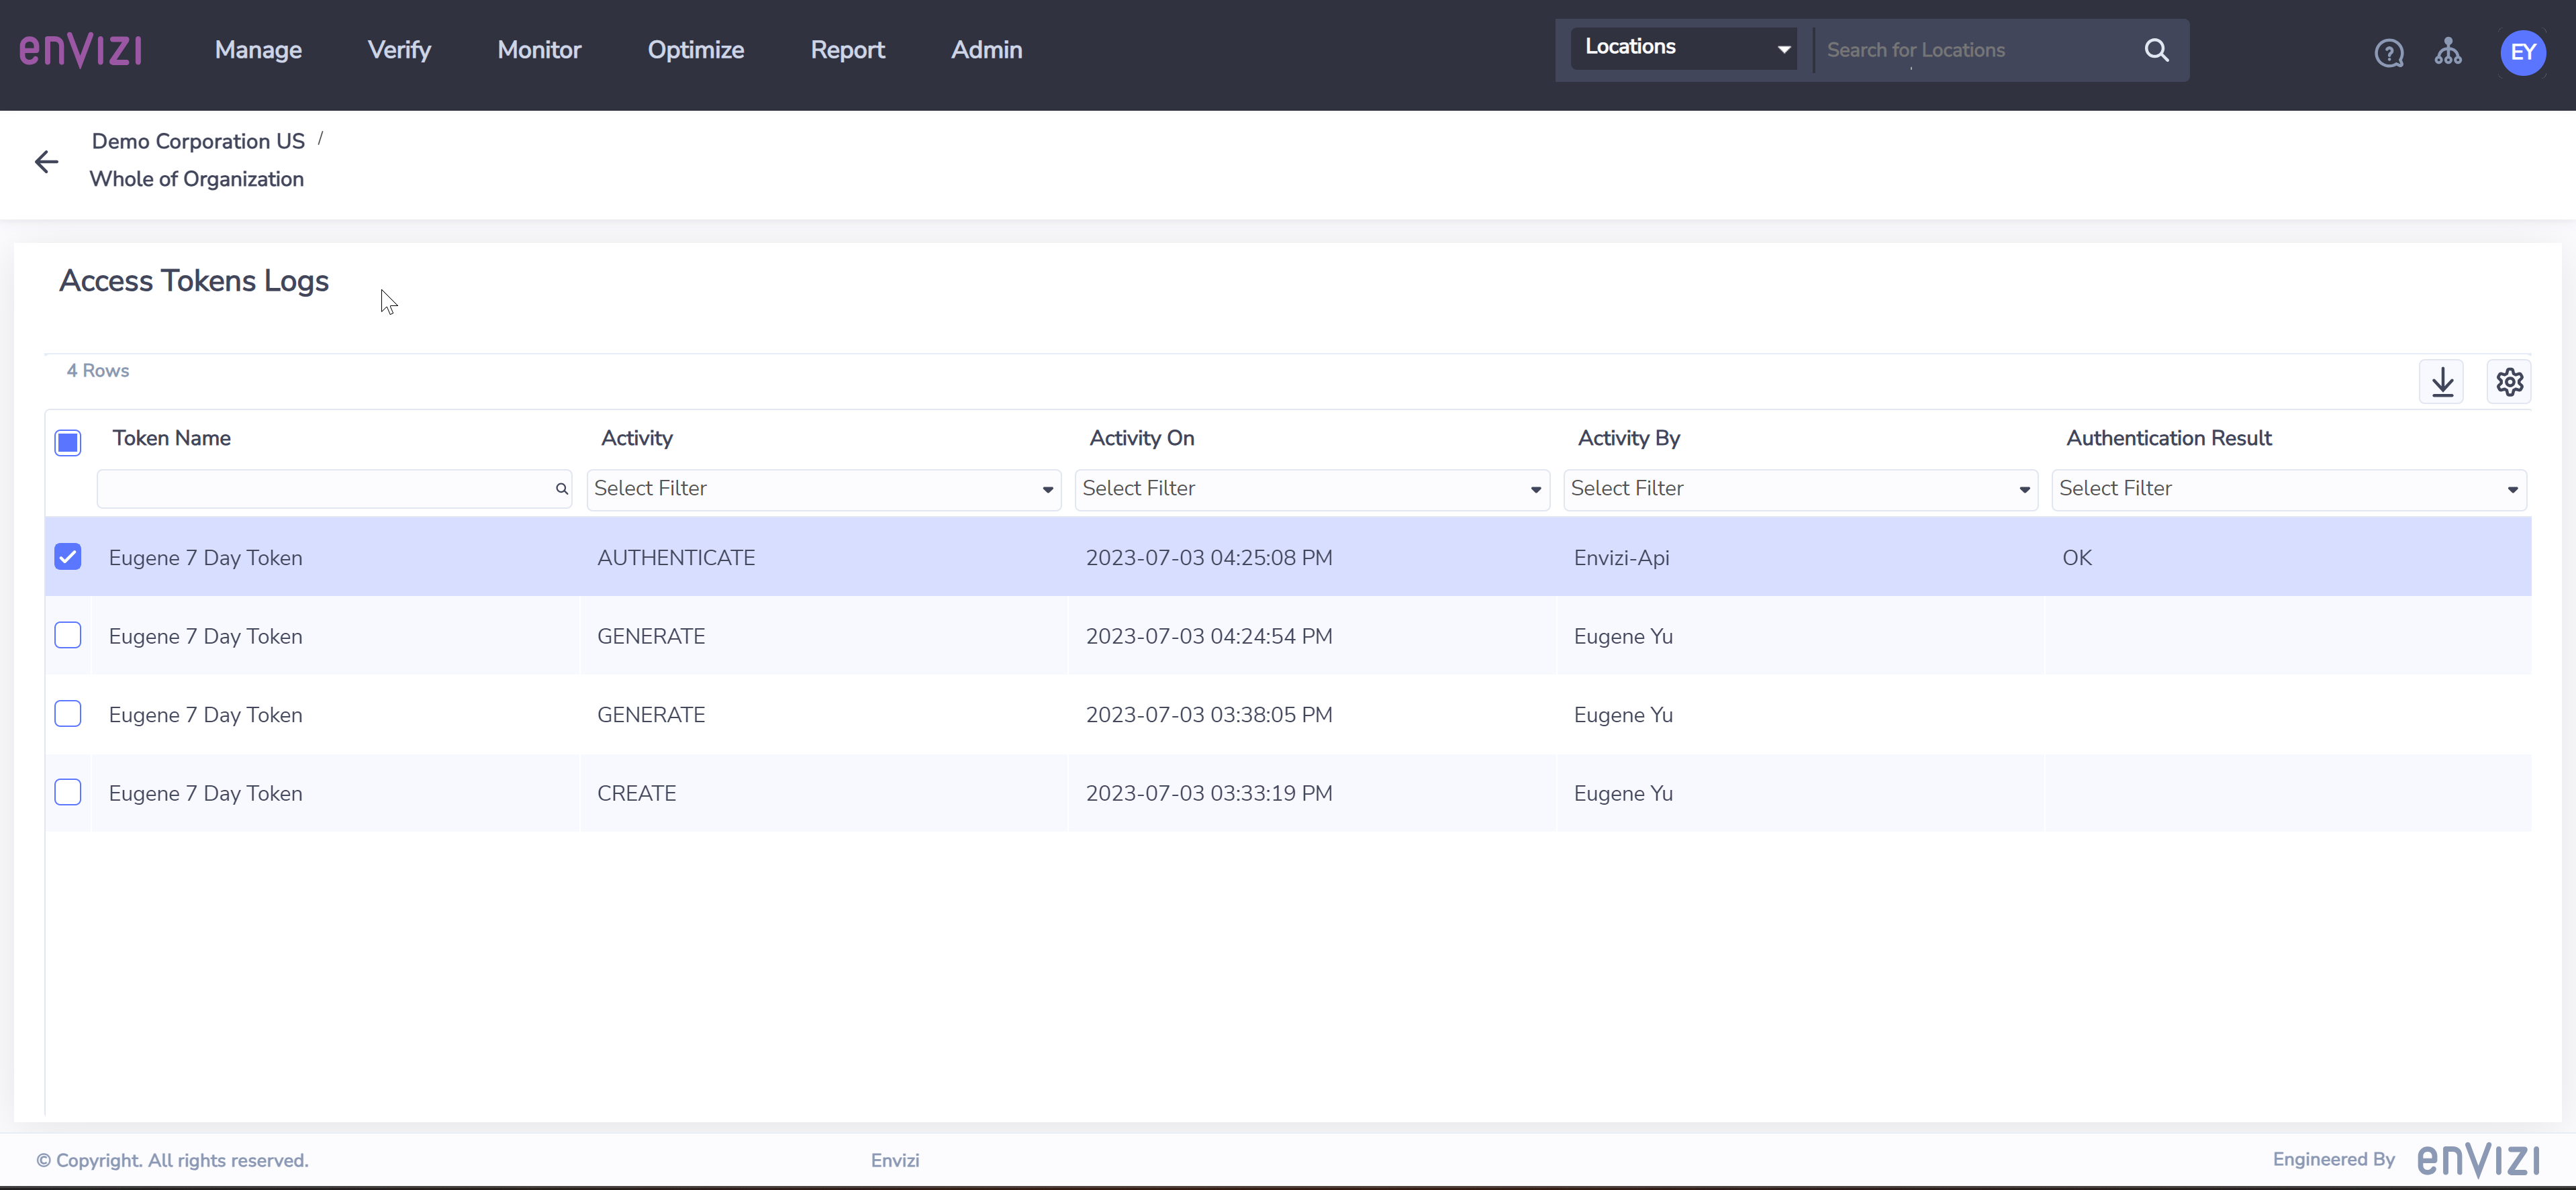
The definition of each column in the token logs grid is as follows:
Token Log Field | Description |
|---|---|
Token Name | Name of the access token |
Activity | Changes associated with the token:
|
Activity On | Date and time when the activity happened |
Activity By | User who performed the activity. If its activity is AUTHENTICATE, Activity By will show the application where the JWT(token) was used, for example, “Envizi-Api” |
Authentication Result | The authentication result if the activity is AUTHENTICATE
|
Advanced Topics on Envizi API Access Tokens
For other advanced topics such as token revokation, system admin view of token inventories of all users, please refer to the API Access Token Advanced Topics page.